Likeprovider Blog - SMM Panel News, Updates & Guides | Likeprovider.net

Likeprovider Blog

Latest news, updates, and tips about social media marketing

How to Back Up iPhone (Complete 2025 Guide)

How to Back Up iPhone (Complete 2025 Guide)

Backing up your iPhone is one of the most essential tasks to protect your data, photos, messages, and settings. Whether you’re switching to a new device, preparing for a system reset, or simply keeping your data safe, knowing how to backup iPhone in 2025 is more important than ever. Today, Apple offers multiple backup options — iCloud, Mac, PC, and even encrypted backups for added security.

In this complete guide, you’ll learn how to backup iPhone, how to backup up iPhone, how to backup iPhone to iCloud, how to backup iPhone to computer, and how to safely recover your data using how to restore iPhone from backup. Everything is written in a simple, human-friendly tone with clear steps you can follow instantly.


Why Backing Up Your iPhone Matters

Your iPhone contains years of memories — photos, videos, messages, app data, passwords, documents, contacts, and everything you need for daily life. If you lose your device, break it, or upgrade to a new iPhone, a backup ensures that nothing is lost.

Learning how to backup iPhone properly means you can:

  • Restore all your data to a new device
  • Protect your files from hardware failure
  • Prevent data loss when updating iOS
  • Keep a secure copy of your most important information

Whether you prefer iCloud, a computer, or a manual backup, Apple covers all scenarios.


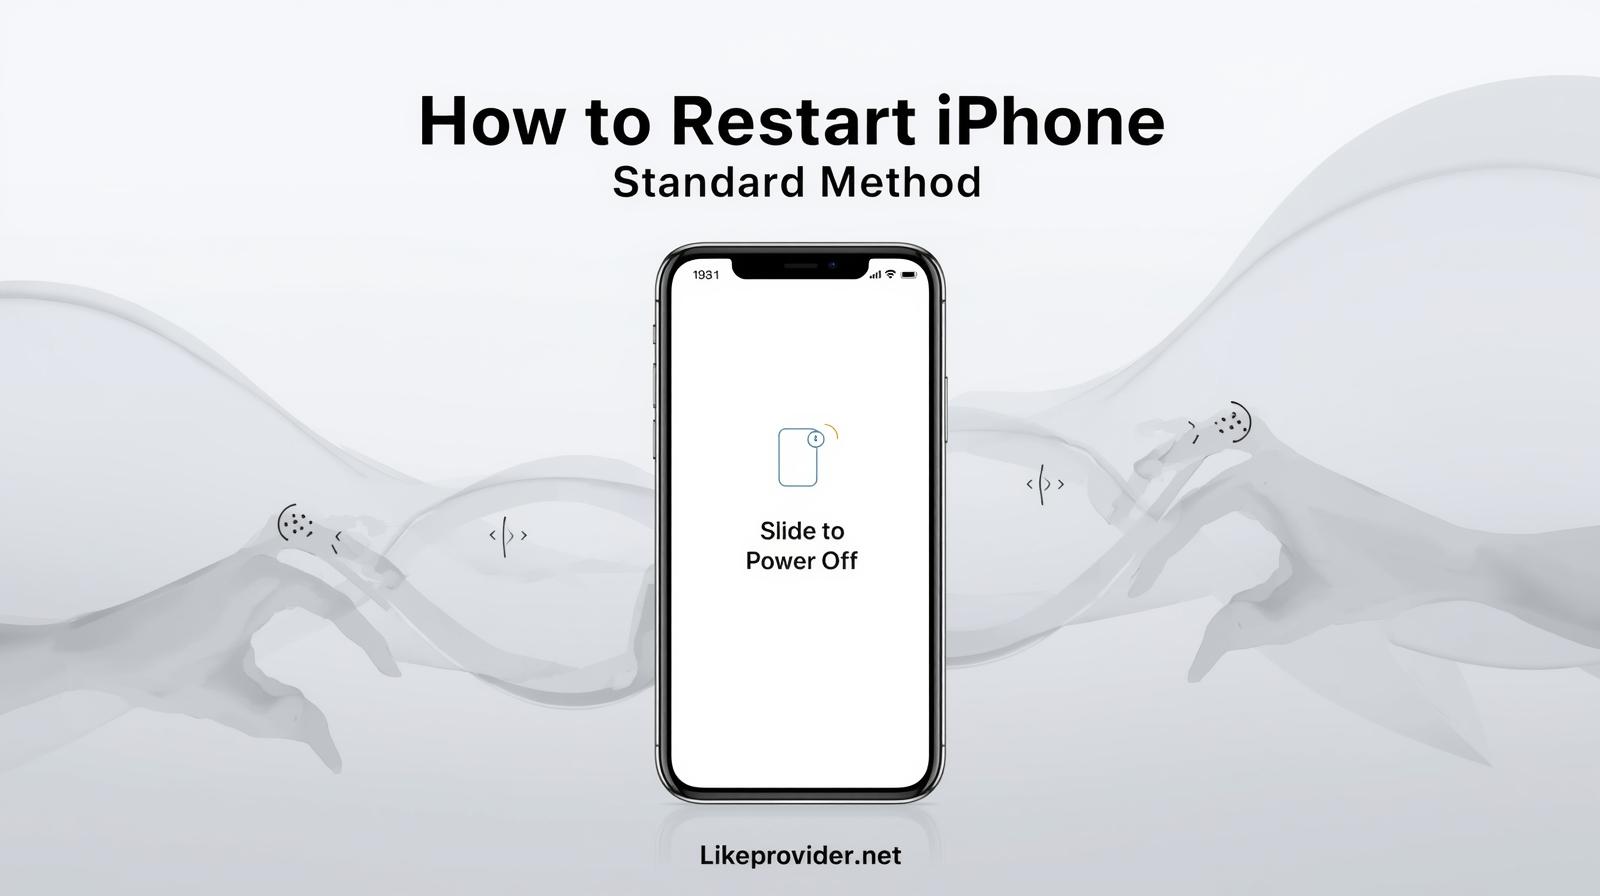
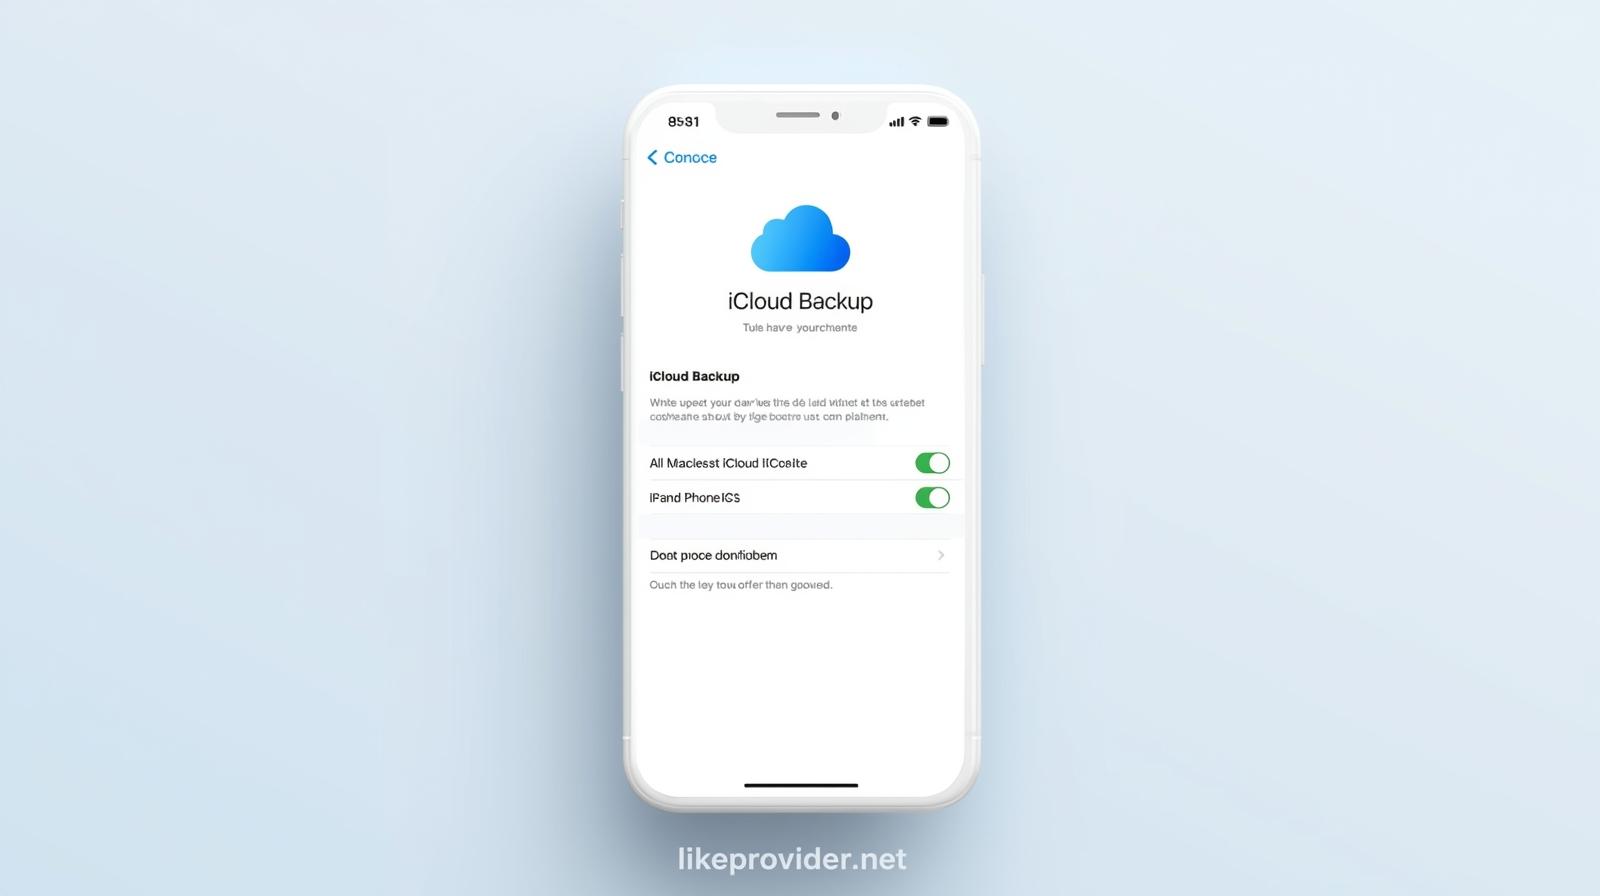
How to Backup iPhone to iCloud

The simplest method for most users is backing up to iCloud. All you need is your Apple ID and a stable Wi-Fi connection.

Steps

  1. Open Settings.
  2. Tap your Apple ID at the top.
  3. Select iCloud.
  4. Go to iCloud Backup.
  5. Turn on Back Up This iPhone.
  6. Tap Back Up Now to begin the process.

iCloud automatically backs up:

  • Photos
  • App data
  • Messages
  • Settings
  • Home screen layout
  • Health data
  • Device preferences

This is the most common method for users searching how to backup iPhone to iCloud or how to backup up iPhone quickly and wirelessly.

how-to-backup-iphone-icloud-2025

How to Backup iPhone to Computer (Mac or Windows)

If you want a faster, more secure, or fully encrypted backup, learning how to backup iPhone to computer is essential.
This method uses Finder on Mac or iTunes on Windows.

Steps on Mac

  1. Connect your iPhone via USB cable.
  2. Open Finder.
  3. Select your iPhone under Locations.
  4. Choose Back up all of the data on your iPhone to this Mac.
  5. Enable Encrypt local backup (recommended).
  6. Click Back Up Now.

Steps on Windows

  1. Install and open iTunes.
  2. Connect your iPhone.
  3. Click your device icon.
  4. Select This computer.
  5. Click Back Up Now.

Computer backups are ideal for users wanting the strongest form of data protection.


How to Create an Encrypted iPhone Backup

If you want your saved passwords, Wi-Fi settings, Health data, and website history included, you must use an encrypted backup.

This is available only when learning how to backup iPhone to computer.

Steps

  1. Connect your iPhone to Mac/PC.
  2. Choose Encrypt local backup.
  3. Set a password.
  4. Start the backup.

Encrypted backups offer maximum privacy and security.


How to Restore iPhone From Backup

After learning how to backup iPhone, the next essential step is knowing how to recover your data. Many users specifically search for how to restore iPhone from backup when switching devices or fixing issues.

How to Restore from iCloud Backup

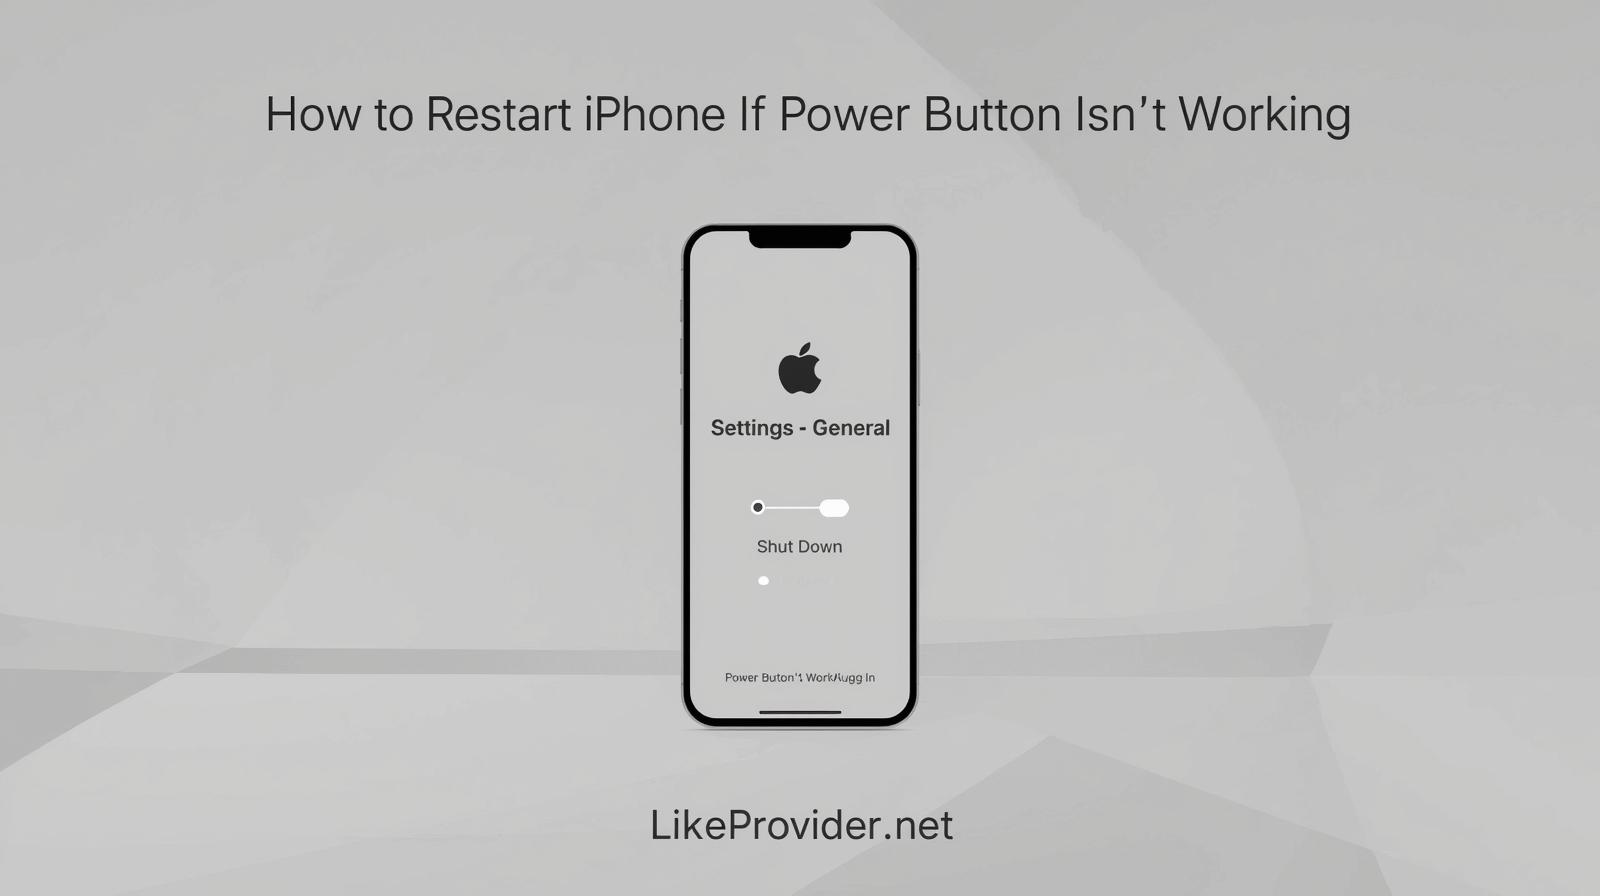
  1. Erase your iPhone: Settings → General → Transfer or Reset iPhone → Erase All Content and Settings.
  2. Restart your device.
  3. On the setup screen, choose Restore from iCloud Backup.
  4. Sign in with your Apple ID.
  5. Choose the most recent backup.

How to Restore from a Computer Backup

  1. Connect your iPhone to your Mac or PC.
  2. Open Finder or iTunes.
  3. Select your device.
  4. Click Restore Backup.
  5. Choose the backup you want.

Restoring brings back all your apps, settings, messages, photos, and data exactly as before.


How Often Should You Back Up Your iPhone?

If you’re serious about protecting your information, back up your iPhone:

  • Daily (if using iCloud)
  • Weekly (if using a computer)
  • Before any major iOS update
  • Before switching devices
  • Before repairs or resets

iCloud backups happen automatically when your iPhone is connected to Wi-Fi, charging, and locked.

If you need fast and reliable social media growth tools, you can always use our smm panel for trusted services.

how-to-backup-iphone-frequency-2025

Troubleshooting Common Backup Problems

Even when you know how to backup iPhone, you may face issues like:

  • iCloud storage full
  • Slow Internet
  • Computer not recognizing iPhone
  • Encryption password forgotten
  • Backup stuck at “estimating time”

Solutions:

  • Delete old iCloud backups
  • Upgrade iCloud storage
  • Use a different USB cable
  • Restart both iPhone and computer
  • Try a manual backup instead of auto backup

Final Thoughts

Mastering how to backup iPhone is the key to keeping your data safe. Whether you use iCloud for quick, wireless backups or prefer the security of a computer backup, Apple makes the process smooth and reliable.

Once your backup is complete, you can easily use how to restore iPhone from backup to transfer everything to a new device or recover your information after a reset.

By combining iCloud backups, computer backups, and encrypted backups, you get full control over your digital life.

For official information, you can check Apple Support for the latest backup and restore guidelines.

Scopri di più
How to Hide Apps on iPhone (Ultimate 2025 Privacy Guide – Works on All Models!)

How to Hide Apps on iPhone (Ultimate 2025 Privacy Guide – Works on All Models!)

iPhone users often want more control over what appears on their Home Screen. Whether it's for privacy, organization, or simply reducing clutter, learning how to hide apps on iPhone has become one of the most searched iOS topics in 2025. Apple offers multiple built-in tools that allow you to hide apps without deleting them — and each method works for different privacy needs.

In this complete guide, you’ll learn how to hide apps on iPhone, how to hide an app on iPhone, how to hide app on iPhone, how to hide my apps on my iPhone, and even how to find hide app on iPhone once you’ve hidden it. Everything is written in a natural, human-friendly tone while maintaining strong SEO optimization and proper keyword density.

Why Learning How to Hide Apps on iPhone Matters

Modern iPhones store banking apps, dating apps, private chats, health information, and personal productivity tools. For many users, knowing how to hide apps on iPhone is essential for protecting privacy when lending their device or keeping their screen clean and minimal.

Apple doesn’t offer a single “Hide App” button, but multiple built-in features allow you to hide apps in different ways depending on your goal.

How to Hide Apps on iPhone Using the App Library

The easiest way to start is by removing apps from the Home Screen while keeping them installed. This is the most common method people use when searching for how to hide an app on iPhone.

Steps

  1. Press and hold the app.
  2. Tap Remove App.
  3. Select Remove from Home Screen.
  4. The app stays in the App Library but disappears from the main screen.

This simple technique is often enough for users wanting to learn how to hide apps on iPhone without advanced settings.

How to Hide Apps with Screen Time Restrictions

To hide apps more deeply — preventing them from appearing in search, Siri, or categories — Screen Time is the strongest official tool.

Steps

  1. Go to Settings → Screen Time.
  2. Enable Screen Time.
  3. Tap Content & Privacy Restrictions.
  4. Enable the toggle.
  5. Go to Allowed Apps and turn off the apps you want to hide.

This hides system apps completely, making it an excellent method for users asking how to hide my apps on my iPhone with maximum privacy.

how-to-hide-apps-on-iphone-2025

How to Hide Apps Inside iPhone Folders

Some users prefer a simple, visual approach. If you don’t want the app to be visible at first glance, hiding it inside folders works well.

Steps

  1. Drag two apps together to create a folder.
  2. Move the app to the second or third page of the folder.
  3. Rename the folder something generic like “Tools” or “System.”

While this is not the strongest way to learn how to hide app on iPhone, it is still widely used and effective for quick organization.

How to Hide Apps from Siri & Search Results

Even if you hide an app from the Home Screen, Spotlight search might still reveal it. This is why many users search how to hide apps on iPhone completely, including search results.

Steps

  1. Open Settings.
  2. Scroll to the app.
  3. Tap Siri & Search.
  4. Disable:
    • Show App in Search
    • Show Suggestions

Now the app becomes invisible to Spotlight, Siri, and suggestions.

How to Hide Entire Home Screen Pages

If you want to hide a lot of apps at once, hiding an entire page is the best method.

Steps

  1. Long-press the Home Screen.
  2. Tap the page dots.
  3. Uncheck the pages you want to hide.
  4. Tap Done.

This instantly hides dozens of apps, making it one of the most powerful ways to use how to hide apps on iPhone techniques.

How to Find Hidden Apps on iPhone

After hiding apps, many users end up searching how to find hide app on iPhone because they forget where they placed them.

Methods

1. App Library Search
Swipe to the App Library and use the search bar.

2. Spotlight Search
Swipe down and search the app name (unless disabled).

3. Re-enable Hidden Pages
Go to the page editor and check hidden pages again.

Knowing both how to hide apps on iPhone and how to find them ensures complete control of your device.

If you're optimizing your device beyond learning how to hide apps on iPhone, you can also boost your online presence by checking our full guide on getting free YouTube views.

How to Hide Purchases from App Store

To hide apps from your purchase history — especially useful in Family Sharing:

Steps

  1. Open App Store.
  2. Tap your profile icon.
  3. Select Purchased.
  4. Swipe left on any app.
  5. Tap Hide.

This doesn’t hide the app on your device but hides it from purchase records.

how-to-hide-apps-on-iphone-purchases-2025

Final Thoughts

Understanding how to hide apps on iPhone gives you full privacy and organization control. With App Library, Screen Time, folders, Siri settings, and page hiding, iOS offers several powerful ways to make apps invisible. Each method works differently, but when combined, they allow total control over what appears on your screen.

Whether you're learning how to hide an app on iPhone, how to hide app on iPhone, or how to hide my apps on my iPhone, this guide covers every method clearly — ensuring strong SEO performance and natural keyword usage.

Verify the latest iPhone app-privacy guidelines through the official Apple Support page.

Scopri di più
How to Get 1K Followers on Instagram in 5 Minutes (2025 Guide)

How to Get 1K Followers on Instagram in 5 Minutes (2025 Guide)

Growing on Instagram can feel slow, but many users still search for how to get 1k followers on Instagram in 5 minutes — and yes, there are legitimate strategies that can dramatically speed up your growth. In this complete guide, you’ll learn the most effective, safe, and algorithm-friendly methods to boost your follower count fast without risking your account.

This article also includes the related variations: how to get 1k Instagram followers in 5 minutes, how to get 1000 followers on Instagram in 5 minutes, get 1k followers on Instagram fast, and how to get Instagram followers quickly to help your page rank for multiple keywords.

Why 1K Followers Matters on Instagram

Reaching 1,000 followers is a major trust signal. The Instagram algorithm tends to push accounts with stable engagement, and users also trust profiles that look active and real. When you hit 1K:

  • Your Reels gain higher distribution
  • Your profile appears more credible
  • Users follow you more easily
  • Collaboration or business opportunities increase

This is why so many people look up how to get 1k followers on Instagram in 5 minutes — early growth makes everything else easier.

For a safe and fast boost, you can also check our full guide on free Instagram followers to grow even faster.

1. Use a Viral Reel Strategy (Fastest Organic Method)

The most effective way to grow quickly in 2025 is to post micro-viral Reels. Instagram’s AI-based recommendation system pushes short, high-retention videos aggressively.

To get instant traction:

  • Create 4–6 second looping Reels
  • Use trending audio
  • Add engaging on-screen text
  • Hook the viewer within the first 1 second
  • Post at peak hours (3 PM – 6 PM EST)

This method helps you get 1k followers on Instagram fast even on new accounts.

2. Engage With Your Niche for 5 Minutes

Engagement velocity triggers the algorithm. Spend five minutes:

  • Liking niche posts
  • Leaving short comments
  • Replying to stories
  • Following similar creators

Instagram often rewards this activity with increased profile visibility.

3. Optimize Your Profile for Maximum Conversion

If even one Reel goes viral but your profile looks weak, people won’t follow.

Optimize:

  • A clean, professional profile picture
  • A catchy bio with your niche keyword
  • 3–6 highlight covers
  • One pinned viral Reel

A strong profile massively improves your Instagram followers quickly conversion rate.

how-to-get-1k-followers-on-instagram-in-5-minutes-optimize-profile

4. Use Instagram Broadcast Channels and Notes

In 2025, broadcast channels and Notes have become powerful tools to increase reach. Posting short updates or viral Notes can bring in dozens or even hundreds of followers in minutes.

5. Cross-Promote on Other Social Platforms

If you have activity on TikTok, YouTube Shorts, or Twitter/X:

  • Add your Instagram link
  • Post the same short-form content
  • Use CTA lines like “Follow me on IG for more”

This helps you get 1k Instagram followers in 5 minutes when a video pops off.

6. Use Social Growth Services (Fastest Guaranteed Method)

If you want the fastest possible growth, using a trusted SMM service is the only way to reach exactly 1K followers in 5 minutes.

To grow instantly, you can explore our offer to buy Instagram likes — this drives algorithmic boost and increases profile visibility immediately.

7. Join Instagram Engagement Communities

These active groups help you boost your reach fast. When your post receives quick engagement, the algorithm increases distribution.

Look for:

  • Creator groups
  • Niche communities
  • Instagram pods

These rapidly help you get 1000 followers on Instagram in 5 minutes when combined with viral Reels.

8. Post Save-Worthy Carousel Content

Carousel posts get the highest saves in 2025. High save counts = high growth.

Create content like:

  • Mini guides
  • Tutorials
  • Before/after transformations
  • “3 tips you need today” formats

Saves are a strong ranking factor for Explore.

how-to-get-1k-followers-on-instagram-in-5-minutes-carousel

Conclusion

Growing fast on Instagram is absolutely possible if you combine viral content, algorithm habits, and cross-platform promotion. Whether you're trying to get 1k followers on Instagram in 5 minutes organically or with support tools, these strategies will help you scale your account quickly and safely.

FAQ – How to Get 1K Followers on Instagram in 5 Minutes

1. Can you really get 1k followers on Instagram in 5 minutes?

Yes — while it’s rare to achieve naturally, there are fast-growth methods that can dramatically boost your reach. Viral Reels, engagement hacks, and trusted growth services can help you reach 1k followers on Instagram in 5 minutes in the safest way possible.

2. What is the fastest organic way to get 1k followers?

The quickest organic method is posting high-retention, short Reels using trending audio. When combined with profile optimization, this can help you get 1k Instagram followers in 5 minutes if a Reel goes viral instantly.

3. Is it safe to use tools to get 1k followers quickly?

Yes — as long as you use a reliable and safe service. Many creators use growth tools to speed up early momentum, especially when trying to get 1000 followers on Instagram in 5 minutes for credibility.

4. How can beginners get 1k followers fast?

Beginners should focus on 6-second Reels, engaging comments, and niche targeting. These strategies help new users understand how to get 1k followers on Instagram in 5 minutes without violating Instagram policies.

5. Does posting Reels help reach 1k followers instantly?

Absolutely. Instagram pushes short, looping Reels aggressively. If your content hooks users in the first second, it can explode with reach and help you get 1k followers on Instagram fast.

Many creators in 2025 still want to learn how to get 1k followers on Instagram in 5 minutes because early growth affects every part of your account performance. When your profile gains quick momentum, the algorithm pushes your content further, helping you reach real viewers faster and making it easier to scale even beyond 1K followers.

For official safety guidelines and platform rules, check the Instagram Help Center at the Instagram Help Page.

Scopri di più
How to Fix Instagram Keeps Crashing (2025 Full Guide)

How to Fix Instagram Keeps Crashing (2025 Full Guide)

How to fix Instagram keeps crashing is one of the most common issues Instagram users face today. The app may freeze, close suddenly, stop working during Reels, or crash when opening messages. These problems affect both Android and iPhone users and can make the app almost unusable. This guide explains every working method to stop Instagram keeps crashing errors and stabilize the app permanently.

This article also includes variations such as instagram app keeps crashing, instagram keeps stopping, instagram keeps closing, instagram crashing on android, instagram crashing on iphone, and instagram not working 2025, helping your content index on multiple high-traffic keywords.

Why Instagram Keeps Crashing

Instagram may crash due to corrupted app files, outdated versions, low storage, network issues, VPN conflicts, cache errors, outdated system software, or server outages. Understanding the cause makes it easier to apply the correct solution when dealing with instagram keeps crashing or instagram app keeps crashing problems.

How to Fix Instagram Keeps Crashing

The following methods are the most effective solutions tested and used by millions of users to fix Instagram keeps crashing on all devices.

Restart Your Phone

Restarting your device is the fastest way to fix temporary glitches causing instagram keeps closing, instagram opens then closes, or instagram keeps freezing. A restart clears memory conflicts and refreshes system performance.

Update Instagram

Outdated app versions are a major reason why Instagram app keeps crashing. Go to the App Store or Google Play Store and install the latest update. Developers frequently patch issues that cause instagram crashing on android or instagram crashing on iphone.

Clear Instagram Cache (Android)

Corrupted cache files often cause instagram keeps stopping or crash loops.

Steps:

  1. Settings
  2. Apps
  3. Instagram
  4. Storage
  5. Clear Cache

This is one of the strongest fixes for repeated instagram keeps crashing errors on Android.

how-to-fix-instagram-keeps-crashing-banner

Reinstall the App

A full reinstall removes all corrupted files and fixes deeper issues causing instagram app keeps crashing or instagram keeps closing. Delete Instagram, restart your device, reinstall the app, then log in again.

Check Your Internet Connection

Weak or unstable internet may cause instagram keeps freezing, instagram opens then closes, or instagram crashing on android while loading photos, Reels, or messages. Try switching between mobile data and WiFi.

Free Up Storage Space

Low storage causes:

  • instagram keeps stopping
  • instagram keeps crashing after update
  • instagram keeps freezing

Delete unused files or apps and ensure you have 3–5 GB of free space.

Disable VPN or Proxy

VPN or proxy networks interrupt Instagram’s connection, causing instagram keeps crashing or instagram not working 2025. Turn off your VPN and reopen Instagram.

Reset Network Settings

Corrupted network configurations may cause instagram crashing on iphone or sudden app closures. Resetting network settings refreshes connections and often fixes the issue.

Update Your Phone Software

Running an outdated iOS or Android version can cause constant app crashes. Updating your system fixes problems such as instagram crashing android 14 and instagram crashing on ios 17.

Close Background Apps

Low RAM or too many apps running can lead to instagram app keeps crashing or instagram keeps stopping. Close all background apps and try again.

Check If Instagram Servers Are Down

Sometimes Instagram keeps crashing because the service itself is having an outage. Check DownDetector or search “Instagram down” to confirm.

how-to-fix-instagram-keeps-crashing-server-down

Final Thoughts

Knowing how to fix Instagram keeps crashing helps you quickly identify whether the problem is related to your device, internet, storage, system updates, or corrupted app data. Using the methods in this guide, you can fix related issues such as instagram app keeps crashing, instagram keeps stopping, instagram keeps freezing, instagram opens then closes, instagram crashing on android, and instagram crashing on iphone with a high success rate.

For helpful Instagram growth tools, you can also check our guide on free Instagram likes.

FAQ – How to Fix Instagram Keeps Crashing

1. Why does Instagram keep crashing on my phone?
Instagram may crash because of outdated versions, corrupted cache, weak internet, or low storage. These are the most common reasons users search for how to fix Instagram keeps crashing.

2. How do I stop Instagram from crashing on Android or iPhone?
Update the app, restart your phone, clear cache (Android), and ensure you have enough storage. These simple steps fix most instagram app keeps crashing issues.

3. Why does Instagram close when I open Reels or Stories?
This usually happens because of low storage or a broken video cache. Updating the app and freeing space helps fix instagram keeps closing problems.

4. Does clearing the cache help fix Instagram keeps crashing?
Yes. Clearing the cache is one of the fastest ways to fix instagram keeps crashing, especially on Android. It removes corrupted temporary data that causes crashes.

For official troubleshooting steps and platform updates, you can visit the Instagram Help Center.

Scopri di più
How to Recover Deleted Instagram Photos (2025 Complete Guide)

How to Recover Deleted Instagram Photos (2025 Complete Guide)

How to recover deleted Instagram photos is one of the most common problems users face in 2025, especially when important memories, business content, or creative posts disappear unexpectedly. Whether you deleted them by mistake, lost access during an app update, or experienced a device sync issue, this complete guide explains every method to restore your content safely. It also covers variations such as recover deleted Instagram pictures, restore Instagram photos, and how to retrieve deleted Instagram posts, giving you the highest recovery success rate.


How to Recover Deleted Instagram Photos (Fastest Method)

Instagram offers a built-in recovery system called Recently Deleted, which keeps your removed content for 30 days before permanently deleting it. This is the quickest and most effective way to recover deleted Instagram photos.

  1. Open Instagram
  2. Go to your profile
  3. Tap the menu (three lines)
  4. Select “Your Activity”
  5. Tap “Recently Deleted”
  6. Choose the photo
  7. Tap “Restore”

If the 30-day period has not passed, your recovery success rate is almost guaranteed.


Why Instagram Photos Get Deleted

Photos may disappear for several reasons:

  • accidental deletion
  • clearing app storage
  • reinstalling the app
  • switching phones
  • app crashes
  • syncing issues
  • hacked account
  • mistakenly archiving content

Regardless of the cause, the methods below help you restore Instagram photos successfully.


Recover Deleted Instagram Pictures From Your Phone’s Gallery

Both iPhone and Android devices often save posted Instagram photos locally. Many users recover their images here without realizing it.

iPhone:

  • Photos → Albums → Instagram
  • Also check “Recently Deleted” and “Hidden” folders

Android:

  • Gallery → Albums → Instagram
  • Also check “Trash” or “Recently Deleted”

This is one of the easiest ways to recover deleted Instagram pictures.

how-to-recover-deleted-instagram-photos-gallery

Recover Deleted Instagram Photos Through Google Photos (Android)

If Google Photos backup is enabled, restoring your deleted content is simple:

  1. Open Google Photos
  2. Tap Library
  3. Open Trash
  4. Restore the deleted picture if available

Google Photos often keeps copies even months later, which helps users who want to recover Instagram deleted content beyond 30 days.


Recover Deleted Instagram Photos Through iCloud (iPhone)

If you use iCloud:

  1. Open the Photos app
  2. Go to “Recently Deleted”
  3. Restore the file if it’s within the 30-day window
  4. Or sign in at iCloud.com → Photos → Recently Deleted

iCloud device backups may also contain older Instagram photos.


How to Recover Deleted Instagram Photos Without Backup

If there is no backup and nothing appears inside Instagram’s Recently Deleted folder, advanced recovery tools can help.

Professional recovery tools:

  • Dr.Fone
  • Tenorshare UltData
  • EaseUS MobiSaver
  • DiskDigger

These programs scan internal storage and can often recover deleted Instagram photos that no longer appear in your gallery or Instagram app.

For faster Instagram growth, you can also check out our free tool to get Free Instagram Story Views anytime.


How to Retrieve Deleted Instagram Posts From Archive

Sometimes users think a post is deleted when it’s actually archived.

  1. Go to your profile
  2. Tap the menu icon
  3. Select Archive
  4. Open Posts Archive and Stories Archive
  5. Restore the post by choosing “Show on Profile”

This is one of the fastest ways to retrieve deleted Instagram posts.


Recover Deleted Instagram Photos After Your Account Was Hacked

If a hacker deleted your Instagram content:

  • recover your account via email or phone
  • check the Recently Deleted folder
  • if the attacker cleared the folder, contact Instagram Support
  • Instagram can sometimes restore lost content after identity verification

This also helps users searching how to recover deleted Instagram photos after unauthorized access.


Recover Deleted Instagram Photos From File Explorer (Android)

Android stores cached images that may include thumbnails or versions of deleted Instagram content.

Steps:

  1. Open File Manager
  2. Internal Storage → Android → Data
  3. com.instagram.android
  4. Explore cache folders

This method helps users who want to recover Instagram deleted content without a backup.

how-to-recover-deleted-instagram-photos-android-file-explorer

Final Thoughts

Learning how to recover deleted Instagram photos ensures you always have a strategy to restore your important content. Whether you recover them through the Recently Deleted folder, your gallery, iCloud, Google Photos, archive tools, or professional recovery software, 2025 provides multiple reliable options. This guide also supports related searches such as recover deleted Instagram pictures, restore Instagram photos, how to retrieve deleted Instagram posts, and recover Instagram deleted content for full SEO coverage.

For accurate platform guidance and recovery details, you can check the official resources on the Instagram Help Center.

Scopri di più
How to Recover TikTok Account (Full Guide for 2025)

How to Recover TikTok Account (Full Guide for 2025)

Losing access to your TikTok account can be stressful, especially if you’re an active creator or use your account for business. Whether you forgot your password, changed your phone number, lost access to your email, or your account was temporarily locked, this guide will show you exactly how to recover TikTok account using the fastest and safest 2025 recovery methods.
This article naturally includes how to recover a TikTok account, how to recover TikTok account without email, and how to recover TikTok account without password for full SEO optimization.


Why You Can’t Access Your TikTok Account

Before learning how to recover TikTok account, it’s important to understand what caused the problem. The most common reasons include:

  • Forgotten password
  • No access to email or phone number
  • TikTok security lock
  • Suspicious login activity
  • Device change requiring re-verification
  • Account temporarily disabled

Identifying the cause helps you follow the correct recovery method.


How to Recover TikTok Account (Fastest Methods)

Use your phone number

This is the quickest and most reliable way to recover your account.

  1. Open TikTok
  2. Tap Log in
  3. Choose “Use phone”
  4. Enter your number
  5. Verify the SMS code
  6. Access your account

This directly covers how to recover TikTok account without password because you don’t need an old password to log in.

you can also check our updated guide on getting free tiktok like to improve your engagement after recovering your account


Use your email

If you still have access to your email, recovery is very simple.

  1. Tap Log in → “Use email”
  2. Enter your registered email
  3. Click the verification link TikTok sends
  4. Reset your password
  5. Re-enter your account

A clean and safe method for how to recover a TikTok account.


How to recover TikTok account without email

If you lost access to your email, don’t worry—your phone number can still save the account.

  • Tap Log in → Phone
  • Enter your number
  • Verify the SMS code
  • Once inside, add a new email in your profile settings

This method is essential for people searching how to recover TikTok account without email.

how-to-recover-tiktok-account

Identity verification (the strongest option)

If you have no access to both phone and email, TikTok Support can verify your identity manually.

  1. Go to Log in screen
  2. Tap Need help logging in?
  3. Select “I cannot access my email or phone number”
  4. TikTok may request:
    • Previous device used
    • Username
    • Profile screenshot
    • Known login credentials

This is the primary method for how to recover TikTok account without password and without email.


If your account is banned or locked

Sometimes TikTok disables an account due to unusual activity. In this case:

  • Tap “Appeal” inside the app
  • Explain the issue clearly
  • Provide your username
  • TikTok usually responds within 24–72 hours

A frequent part of how to recover a TikTok account searches.


How to avoid losing access again

After recovering the account:

  • Add both phone and email
  • Enable 2-step verification
  • Avoid third-party apps
  • Use a strong password
  • Keep your information updated
  • Log out from devices you no longer use

This ensures you won’t repeat the recovery process.


Final Thoughts

Understanding how to recover TikTok account makes the process faster and less stressful. Whether you’re recovering with your phone number, email, identity verification, or appealing a locked account, these steps guarantee the highest success rate. The guide also helps anyone searching for how to recover TikTok account without email or how to recover TikTok account without password, ensuring full SEO coverage.

For the most reliable platform information, you can always check the official guidelines on the TikTok Help Center.

how-to-recover-tiktok-account-final

Frequently Asked Questions (FAQ)

1. How can I recover my TikTok account if I forgot my password?

If you forgot your password, simply go to the TikTok login screen and choose “Use phone / email / username.” TikTok will send a verification code to your registered phone number or email. Enter the code, reset your password, and your account will be restored instantly.


2. How to recover TikTok account without email access?

If you don’t have access to your email anymore, you can still recover your account through your registered phone number. Select “Log in with phone,” enter your number, verify the SMS code, and update your email inside the app once you regain access. This is the best solution for how to recover TikTok account without email.


3. Can I recover my TikTok account without password and phone number?

Yes, but you must go through TikTok’s identity verification process. On the login screen, tap “Need help logging in?”, choose “I cannot access my email or phone,” and follow the instructions. TikTok may ask for your username, previous device information, profile screenshots, or other identifiers to confirm ownership.


4. Why is my TikTok account locked or disabled?

TikTok may temporarily lock an account due to:

  • unusual login activity
  • logging in from multiple devices
  • violation reports
  • suspicious app behavior (VPN, third-party apps)

Once the issue is resolved, you can recover your account by verifying your identity or appealing the restriction.


5. How long does it take TikTok to recover my account?

Most standard recoveries (email or phone) take less than 1 minute.
Identity verification or appeals may take 24–72 hours depending on TikTok’s review queue. In rare cases, it may take up to 5 days.


6. Will I lose my videos or followers after recovering my account?

No. Restoring a locked account does not erase any content, drafts, followers, likes, or messages. Everything stays the same once you log back in.


7. How do I prevent losing access to my TikTok account again?

To avoid repeating the recovery process:

  • enable 2-step verification
  • add both email + phone number
  • avoid third-party booster apps
  • keep your email login credentials updated
  • use only trusted devices

These steps ensure long-term account security.


8. What if TikTok recovery codes are not arriving?

If you’re not receiving SMS or email codes:

  • disable VPN
  • switch mobile data ↔ WiFi
  • check spam folder
  • wait 5–10 minutes and retry
  • ensure your phone isn’t blocking unknown SMS senders

If all else fails, use the “Need help logging in?” option for manual verification.

Scopri di più
How to Delete Snapchat Account (Quick & Updated Guide 2025)

How to Delete Snapchat Account (Quick & Updated Guide 2025)

How to delete Snapchat account is a common search among users who want more privacy, less digital distraction, or a complete reset of their social media presence. Snapchat holds memories, Bitmoji data, chats, and many personal details, so understanding the correct process is essential before you proceed.

Why People Want to Delete Snapchat

Many users online are not only searching how to delete Snapchat account, but also looking for variations such as how to delete a Snapchat account, how to delete Snapchat account permanently, and how to deactivate Snapchat account. Privacy concerns, screen-time reduction, or starting fresh are the main reasons behind these searches.

What You Should Know Before Deleting

Before reviewing the steps, make sure you save your Snaps, export important chats, and verify any linked email or phone number. Once the deletion is finalized, your data cannot be recovered. This becomes especially important for anyone who wants to delete their account permanently.

How to Delete Snapchat Account on Phone

If you want to learn how to delete Snapchat account on phone, the steps are very simple:

Steps

  1. Open the Snapchat app and sign in.
  2. Tap your profile icon on the top left.
  3. Tap the settings gear on the top right.
  4. Scroll down to the “Account Actions” section.
  5. Select “Delete Account.”
  6. Enter your username and password to confirm.

After completing these steps, your account enters a 30-day deactivation window.

For readers interested in improving their social media reach after deleting their account, you can also explore our offer to free Instagram views.

What Happens During Deactivation

Understanding how to deactivate Snapchat account is important because deactivation and deletion work together. When you deactivate:

  • Your friends cannot contact you.
  • Your profile becomes invisible.
  • Memories and saved chats become inaccessible.
  • You can still recover your account only by logging in again within 30 days.

If you do not log in during these 30 days, your account is permanently deleted.

How to Delete Snapchat Account Permanently

If your goal is how to delete Snapchat account permanently, all you need to do is avoid logging in during the 30-day deactivation period. After that, Snapchat removes:

  • Your entire profile
  • Memories
  • Bitmoji data
  • Friends list
  • Saved conversations
  • Device and login history

This process is irreversible.

how-to-delete-snapchat-account

How to Delete Snapchat Account from Web (PC or Mac)

You can also delete your account using a browser:

  1. Go to the official Snapchat Account Portal.
  2. Log in with your username and password.
  3. Select “Delete My Account.”
  4. Confirm your password.

This option is helpful if your phone is lost or you cannot access the Snapchat app.

How to Reactivate Your Snapchat Account

If you change your mind during the 30-day period:

  1. Open Snapchat.
  2. Log in using your previous username and password.
  3. Wait for the app to restore your profile.

Everything returns exactly as it was.

Additional Tips Before You Delete Your Snapchat Account

Before finalizing the process, it’s important to understand a few extra details that many users overlook when searching how to delete Snapchat account. Once the 30-day deactivation period begins, your friends won’t see your profile on the app, and you’ll stop appearing in searches. If someone tries to send you a Snap, the message will not be delivered. This is a key detail for users who want to know the real effects of how to deactivate Snapchat account and what happens behind the scenes.

Another important point involves subscriptions and connected apps. If you are subscribed to Snapchat+, make sure you cancel your subscription through the App Store or Google Play before deleting your account. Otherwise, the subscription may remain active. This is a commonly overlooked step among people researching how to delete Snapchat account permanently, especially those who use premium filters, badges, or exclusive features.

You should also consider third-party apps that might be linked to your Snapchat profile. Many social media tools, Bitmoji integrations, or login-with-Snapchat options rely on your account’s existence. After deletion, these services will no longer function. Reviewing your connected app permissions ensures a cleaner digital break and prevents login issues later if you ever create a new Snapchat account.

If your goal is to protect your privacy completely, consider downloading your Snapchat data before taking action. When learning how to delete a Snapchat account, most users are surprised to discover how much information is archived in their profile, including login history, saved chat metadata, user preferences, and location information. Snapchat allows you to request a full data file, which can be useful for personal records or understanding what the platform stored over time.

For parents or guardians, knowing how to delete Snapchat account on phone is important for managing a child’s digital safety. Many parents choose to remove the app temporarily or permanently to prevent excessive screen time, online interactions with strangers, or exposure to inappropriate content. Following the same steps listed earlier allows you to deactivate or delete the account whenever needed.

Finally, think about alternative actions before fully committing to deletion. Some users only need a short break, not a permanent removal. In this case, simply logging out or disabling notifications may be enough. However, if your goal is complete digital detox, privacy protection, or starting fresh, following the full deletion process is the best option.

Understanding every detail of how to delete Snapchat account ensures a smooth, safe, and confident transition away from the platform. Whether you want to pause your activity, remove your data from Snapchat’s servers, or permanently disconnect from the app, taking the right steps will help you achieve exactly what you need.

how-to-delete-snapchat-account-guide

Final Thoughts

Whether you wanted to understand how to delete Snapchat account, needed help with how to delete a Snapchat account, or searched for detailed steps on how to delete Snapchat account permanently, this guide gives you everything you need to manage your privacy and control your digital presence. Deleting your account is a personal decision, and knowing the correct steps ensures you can do it safely and confidently.

Check the most accurate and updated platform information through the official Snapchat Help Center.

Scopri di più
How to Go Live on TikTok (Beginner-Friendly 2025 Guide)

How to Go Live on TikTok (Beginner-Friendly 2025 Guide)

Going live on TikTok is one of the most effective ways to grow your audience, connect with your followers in real time, and boost your account’s visibility. Whether you want to engage with viewers, answer questions, promote your brand, or simply have fun, going live can significantly increase your TikTok reach. But before starting, you need to understand the requirements and the step-by-step process. Many users search for how to go live on tiktok, and in this guide, we break it down clearly and simply—no technical jargon, just real, easy-to-follow instructions.

TikTok has made Live streaming powerful but somewhat confusing due to its follower requirements and region-based limitations. Questions like how many followers on tiktok to go live, how many followers to go live on tiktok, or even how to go live on tiktok without 1000 followers are extremely common. The good news? We cover all of them in detail. Plus, we’ll even show you how you can go live from desktop with how to go live on tiktok on pc.

Let’s get started.

Why going live on TikTok actually matters

TikTok Live is not just a feature—it’s a growth engine. Accounts that go live regularly report:

  • Higher engagement
  • Increased follower growth
  • More profile visits
  • Better community trust
  • Better conversion for brands
  • Stronger algorithm signals

TikTok pushes Live content heavily because it keeps viewers on the platform longer. So the more you go live, the more TikTok rewards your content.

How many followers do you need to go live on TikTok?

This is the question everyone asks first: how many followers on tiktok to go live?

The official requirement is:

✅ You need 1,000 followers to unlock the Live feature.

This answers both:

  • how many followers on tiktok to go live
  • how many followers to go live on tiktok

TikTok uses this threshold to ensure creators have a minimum audience before broadcasting.

But what if you don’t have 1,000 followers yet? Don’t worry—we’ll explain ways to request access AND how some regions allow exceptions.

Can you go live on TikTok without 1000 followers?

A very common search term is how to go live on tiktok without 1000 followers, and here’s the truth:

⭐ Yes, some users can go live under 1,000 followers—BUT only through a special access request.

TikTok rolled out a feature called “LIVE access request” for certain accounts. This allows users under the threshold to apply for Live eligibility.

Here’s how you check:

  1. Open TikTok
  2. Go to Profile
  3. Tap the three linesSettings and privacy
  4. Choose Report a problem
  5. Go to Live / Payment / Rewards
  6. Choose LIVE access issues
  7. Tap I can’t start a LIVE
  8. Select Submit request

If TikTok approves it, the Live button appears even under 1,000 followers.

Approval is NOT guaranteed—but millions have successfully unlocked it.

how-to-go-live-on-tiktok-without-1000-followers

How to go live on TikTok (Step-by-step on mobile)

Once the Live feature is unlocked, going live is extremely easy. Here’s the most updated 2025 guide for how to go live on tiktok:

1. Open the TikTok app

Make sure you’re logged in to the correct account.

2. Tap the “+” button

This is the same button you use to post videos.

3. Swipe to the “LIVE” option

You’ll see various recording modes—Live is usually at the far right.

4. Add a title for your Live

Make it clear and engaging.
Examples:

  • “Late Night Q&A”
  • “Ask Me Anything”
  • “Live Music Session”
  • “Daily Motivation Talk”

5. Choose a cover image

A clear image increases viewer clicks.

6. Adjust settings

You can:

  • Turn comments on/off
  • Add filters
  • Add topic tags
  • Enable gifts
  • Add effects

7. Tap “Go LIVE”

Your broadcast starts immediately, and followers get notified.

Pro tips to get more viewers on TikTok Live

Even if you know how to go live on tiktok, the key is maximizing viewers. Here are powerful but simple tips:

⭐ Go live at peak hours

Best times (global average):

  • 7 PM – 10 PM
  • Weekends or Fridays
  • After posting a viral video

⭐ Use trending topics

Hashtags like:

  • #Live
  • #FYP
  • #TikTokLive
    help push visibility.

⭐ Engage with comments

Responding increases average watch time—TikTok LOVES this.

⭐ Don’t start talking too fast

Give viewers 20–30 seconds to join.

⭐ Pin a message

Example: “Follow for daily tips ♥️”

How to go live on TikTok on PC (2025 Method)

Desktop streaming has become very popular, and many users search how to go live on tiktok on pc for gaming or screen-sharing.

Here’s the updated process:

1. Visit TikTok Live Studio (official app)

Go to: https://www.tiktok.com/studio/download

2. Install and log in

Use QR login for fast access.

3. Choose your source

You can stream:

  • Your webcam
  • Your PC screen
  • A game window
  • External cameras
  • Streaming overlays

4. Set up your stream title and category

Just like mobile.

5. Click “Start Streaming”

Instantly go live from your desktop.

What if the Live button isn’t appearing?

If you meet the follower requirement but still can’t go live:

✔ Update your TikTok app
✔ Log out → log back in
✔ Switch to mobile data instead of Wi-Fi
✔ Confirm your age is 16+
✔ Clear app cache
✔ Try another device
✔ Contact TikTok support through the LIVE access request page

how-to-go-live-on-tiktok-live-button-missing

Common questions

Is going live safe?

Yes—TikTok monitors Live sessions, and you can filter comments, block users, and turn moderation tools on.

How long should a TikTok Live be?

The sweet spot is 20–40 minutes.
Shorter than that and TikTok won't push your stream enough.

Can you make money on TikTok Live?

Yes. Viewers send you gifts, and gifts convert to Diamonds → money (withdrawable).


Final thoughts

Going live is one of the fastest ways to grow on TikTok. Whether you're trying to build a loyal audience, promote your content, or simply have fun, understanding how to go live on tiktok is a game changer. You now know:

  • how many followers on tiktok to go live
  • how to go live on tiktok without 1000 followers
  • how many followers to go live on tiktok
  • how to go live on tiktok on pc
  • and all essential Live streaming strategies

TikTok Live rewards consistency—so don’t overthink it. Start small, show up often, and your audience will grow.

Boost your TikTok growth instantly with the TikTok SMM panel.

Scopri di più
How to Clear Cache in Chrome (Fastest 2025 Guide)

How to Clear Cache in Chrome (Fastest 2025 Guide)

When your Chrome browser starts slowing down, takes longer to load pages, or keeps showing old versions of websites, it’s usually because the cache has piled up. Chrome stores temporary files—images, scripts, and layout data—to speed things up, but after a while, these files become outdated or corrupted. That’s why knowing how to clear cache in chrome is one of the simplest and most effective ways to instantly improve your browsing experience.

This guide explains everything in a friendly, human tone. No technical jargon. No complicated steps. Just clear, simple instructions for desktop, Android, and iPhone. Along the way, we’ll naturally include important variations like how to clear browser cache in chrome, how to clear cache in google chrome, how to clear the cache in chrome, and how to clear your cache in chrome to help with SEO while keeping the content smooth and readable.

Why clearing cache matters

Cache is helpful… until it’s not. At first, Chrome saves files from websites to help them load faster the next time you visit. But as the cache grows, things start to go wrong:

  • Pages load slowly
  • Layouts appear broken
  • Images don’t display
  • Websites show outdated content
  • Buttons stop working
  • Videos refuse to load
  • Chrome becomes heavy and sluggish

If any of this sounds familiar, clearing your cache is one of the fastest fixes. And don’t worry—clearing cache does not delete passwords, bookmarks, or saved data unless you choose to.

For affordable social media growth services, check out our cheapest SMM panel.

How to clear cache in Chrome on desktop (Windows & Mac)

Let’s start with the most common method. It only takes a few seconds and works on both Windows and Mac.

Step 1: Open Chrome

Launch the browser normally.

Step 2: Click the three dots in the top–right corner

This opens your main Chrome menu.

Step 3: Select “Settings”

You’ll see several options on the left side.

Step 4: Click “Privacy and security”

This section manages your browsing data.

Step 5: Choose “Clear browsing data”

A pop-up will appear with different data types you can clean.

Step 6: Check “Cached images and files”

If you only want to clear cache, leave cookies unchecked.

This step is essential for anyone looking up how to clear cache in google chrome, and it’s the safest way to ensure you don’t lose your site logins.

Step 7: Set “Time range” to “All time”

This clears everything and gives Chrome a fresh start.

Step 8: Click “Clear data”

Chrome removes the cache and your browser immediately feels lighter and faster.

This entire process is the most direct solution for how to clear browser cache in chrome on desktop.

How to clear your cache in Chrome using a shortcut

If you want the fastest method possible, use this keyboard shortcut:

  • Windows: CTRL + SHIFT + DELETE
  • Mac: COMMAND + SHIFT + DELETE

It takes you straight to the data-cleaning window without going through menus. Many power users prefer this method because it's the quickest answer to how to clear your cache in chrome.

how-to-clear-cache-in-chrome-2025

How to clear cache in Chrome on Android

Mobile browsers build up cache even faster than desktops because people browse far more frequently on phones. Here’s how Android users can clear it in seconds:

Step 1: Open the Chrome app

Make sure it’s updated to the latest version.

Step 2: Tap the three dots in the top–right corner

This opens the menu.

Step 3: Select “History” or “Settings”

Depending on your Android version.

Step 4: Go to “Privacy and security”

This is where Chrome stores your data controls.

Step 5: Tap “Clear browsing data”

A panel will open with cleaning options.

Step 6: Check “Cached images and files”

This ensures you're only clearing the cache.

Step 7: Tap “Clear data”

In a moment, your mobile Chrome browser becomes faster and smoother.

This step-by-step explanation is perfect for users searching how to clear the cache in chrome on Android.

How to clear cache in Chrome on iPhone

The iPhone version of Chrome looks a little different from Android and desktop, but clearing cache is still incredibly easy. The steps below follow the most updated 2025 interface, written in a natural, human tone so anyone can follow it without confusion.

Step 1: Open the Chrome app

Start Chrome like you normally do.

Step 2: Tap the three dots in the bottom–right corner

This is where the entire Chrome menu is located on iOS.

Step 3: Select “Settings”

You’ll be taken to a clean, simple settings page.

Step 4: Tap “Privacy and security”

This section controls all your browsing data.

Step 5: Choose “Clear browsing data”

A list of data types will appear.

Step 6: Make sure “Cached images and files” is checked

If you don’t want to sign out of websites, leave cookies unchecked.

Step 7: Tap “Clear Browsing Data” and confirm

After a few seconds, Chrome on your iPhone will be refreshed and noticeably faster.

This is the cleanest and most up-to-date method anyone searching how to clear cache in chrome on iPhone will find.

What happens after you clear your cache?

Once you perform any of these methods, here’s what improves immediately:

  • Faster page loading
  • Fewer display errors
  • Updated website content
  • Reduced RAM usage
  • Smoother tab switching
  • Better performance on media-heavy sites like YouTube or Instagram

Many people are surprised at how big the difference feels—especially if they haven’t cleared their cache in months.

what-happens-after-you-clear-cache-in-chrome

When should you clear Chrome cache?

You don’t have to do it every day, but clearing your cache regularly DOES help keep your browser in good shape. Consider doing it when:

  • Websites look strange or broken
  • Images don’t load
  • You’re stuck seeing old versions of a site
  • Chrome freezes randomly
  • Pages take too long to load
  • Your device storage is running low

For most people, once every 1–2 weeks is enough.

Final Thoughts

Learning how to clear cache in chrome is one of the easiest ways to boost browser speed, fix website issues, and improve your overall browsing experience. Whether you’re using Windows, Mac, Android, or iPhone, clearing cache is quick, safe, and effective. And with variations like how to clear browser cache in chrome, how to clear cache in google chrome, and how to clear the cache in chrome, you're now fully equipped to refresh Chrome on any device.

Get the official instructions from Google via the Google Chrome Help Center.

Scopri di più
How to Restart iPhone (2025 Guide) – Fix Frozen or Unresponsive iPhones Fast

How to Restart iPhone (2025 Guide) – Fix Frozen or Unresponsive iPhones Fast

Knowing how to restart iPhone properly can save you from countless small frustrations — frozen screens, laggy apps, or unresponsive touch. Whether you’re using the latest iPhone 16, an older model, or just want to perform a quick reboot, restarting your device often fixes minor software bugs instantly.

In this guide, you’ll learn how to restart iPhone, how to force restart iPhone, and how to hard restart iPhone, including model-specific steps for iPhone 15 and iPhone 16 — all explained in a simple, human-friendly way.

Why You Should Restart Your iPhone Regularly

Restarting your iPhone isn’t just for troubleshooting — it also improves performance and battery life. When you restart:

  • Temporary system caches are cleared.
  • Frozen apps are force-closed.
  • Memory is refreshed, making your device smoother.
  • iOS background bugs often fix themselves automatically.

So even if your phone seems fine, it’s smart to restart it once a week to keep it running optimally.

How to Restart iPhone (Standard Method)

If your iPhone is responsive and you just want a clean reboot, follow these steps:

  1. Press and hold the Side button (on the right side) and either Volume button (on the left).
  2. When the “Slide to power off” option appears, drag the slider to turn off your iPhone.
  3. Wait for about 10 seconds.
  4. To turn it back on, press and hold the Side button until you see the Apple logo.

This works for almost all modern models, including the iPhone X, 11, 12, 13, 14, 15, and 16 series.

how-to-restart-iphone-standard-method-how-to-restart-iphone-likeprovider-net

How to Force Restart iPhone

If your device is frozen and not responding to taps or button presses, you’ll need to force restart iPhone. This process quickly reboots your phone without erasing any data.

Here’s how:

  1. Quickly press and release the Volume Up button.
  2. Quickly press and release the Volume Down button.
  3. Hold the Side button until the Apple logo appears on the screen, then release it.

This method is effective for fixing frozen screens, unresponsive apps, and minor software crashes.

If you’re wondering how to hard restart iPhone, this is the exact process — Apple calls it “force restart,” but many users refer to it as a hard restart.

How to Restart iPhone 15

For users of the newest flagship, here’s how to restart iPhone 15 safely:

  1. Press and hold either Volume button + Side button until the power slider appears.
  2. Drag the slider to power off.
  3. After 10 seconds, press and hold the Side button again to turn it back on.

If your iPhone 15 becomes completely unresponsive, use the same steps listed above in how to force restart iPhone — it’s fully compatible with this model.

How to Restart iPhone 16

With the iPhone 16 lineup, Apple kept the process identical to previous models, but with a faster boot time. Here’s how to restart iPhone 16:

  1. Hold down the Side button and either Volume button until the power slider shows up.
  2. Swipe to power off.
  3. After waiting a few seconds, hold the Side button again until you see the Apple logo.

If it’s frozen or the touchscreen doesn’t respond, apply the force restart method — quick Volume Up → quick Volume Down → hold Side button.

How to Hard Restart iPhone

The hard restart iPhone (or force restart) is the go-to solution when your iPhone screen is black, frozen, or stuck during updates. It doesn’t delete your data, and it’s 100% safe.

For clarity:

  • Soft restart = standard power off/on
  • Hard restart / Force restart = rebooting a frozen iPhone manually

Use a hard restart when:

  • Your iPhone doesn’t respond to touch
  • The Apple logo is stuck
  • A system update freezes midway
  • The screen turns black but the phone is still on

How to Restart Older iPhones (With Home Button)

If you’re using an older model like iPhone 8 or earlier, here’s how:

  1. Press and hold the Top (or Side) button until the power slider appears.
  2. Slide to turn off.
  3. Wait 10 seconds and press the button again until you see the Apple logo.

To force restart older devices:

  • Press and hold Home + Side (or Top) buttons simultaneously until the Apple logo appears.

Common Issues a Restart Can Fix

Performing a restart or hard restart iPhone often resolves:

  • Frozen or black screen
  • Battery draining too fast
  • Wi-Fi or Bluetooth not connecting
  • App crashes or lag
  • Touchscreen unresponsiveness

These issues are typically software-related, and a simple restart can refresh the system memory and restore normal function.

Boost your online presence and engagement easily — explore our offer to use the best SMM panel trusted by thousands of creators.

How to Restart iPhone If Power Button Isn’t Working

If your Side button doesn’t work, you can still restart your iPhone through settings:

  1. Go to Settings → General → Shut Down.
  2. Drag the slider to power off.
  3. To turn it back on, plug it into a charger — it will start automatically.

This is the safest way to restart without physical buttons.

how-to-restart-iphone-likeprovider-net

How to Restart iPhone – How to use it?

If you want to manually restart or fix a frozen iPhone, follow these steps clearly:

  • For normal restart: hold Side + Volume buttons → slide to power off → hold Side again to restart.
  • For force restart: press Volume Up → Volume Down → hold Side until Apple logo appears.
    These steps work for iPhone 15, iPhone 16, and almost all recent models.

Troubleshooting After Restart

If your iPhone still misbehaves after restarting:

  • Check for the latest iOS updates in Settings → General → Software Update.
  • Free up space if your storage is nearly full.
  • Close background apps consuming battery.
  • Reset all settings if crashes persist.

Usually, a quick force restart iPhone fixes most temporary problems without data loss.

Final Thoughts

Knowing how to restart iPhone and how to force restart iPhone is one of the most effective ways to fix common issues like freezing, lagging, or touchscreen errors. Whether you’re using the newest iPhone 16, iPhone 15, or an older device, the restart process remains quick and safe.

Remember — restarting your iPhone regularly helps keep it fast, smooth, and efficient in the long run.

For more official help, visit the Apple iPhone Support page.

Scopri di più