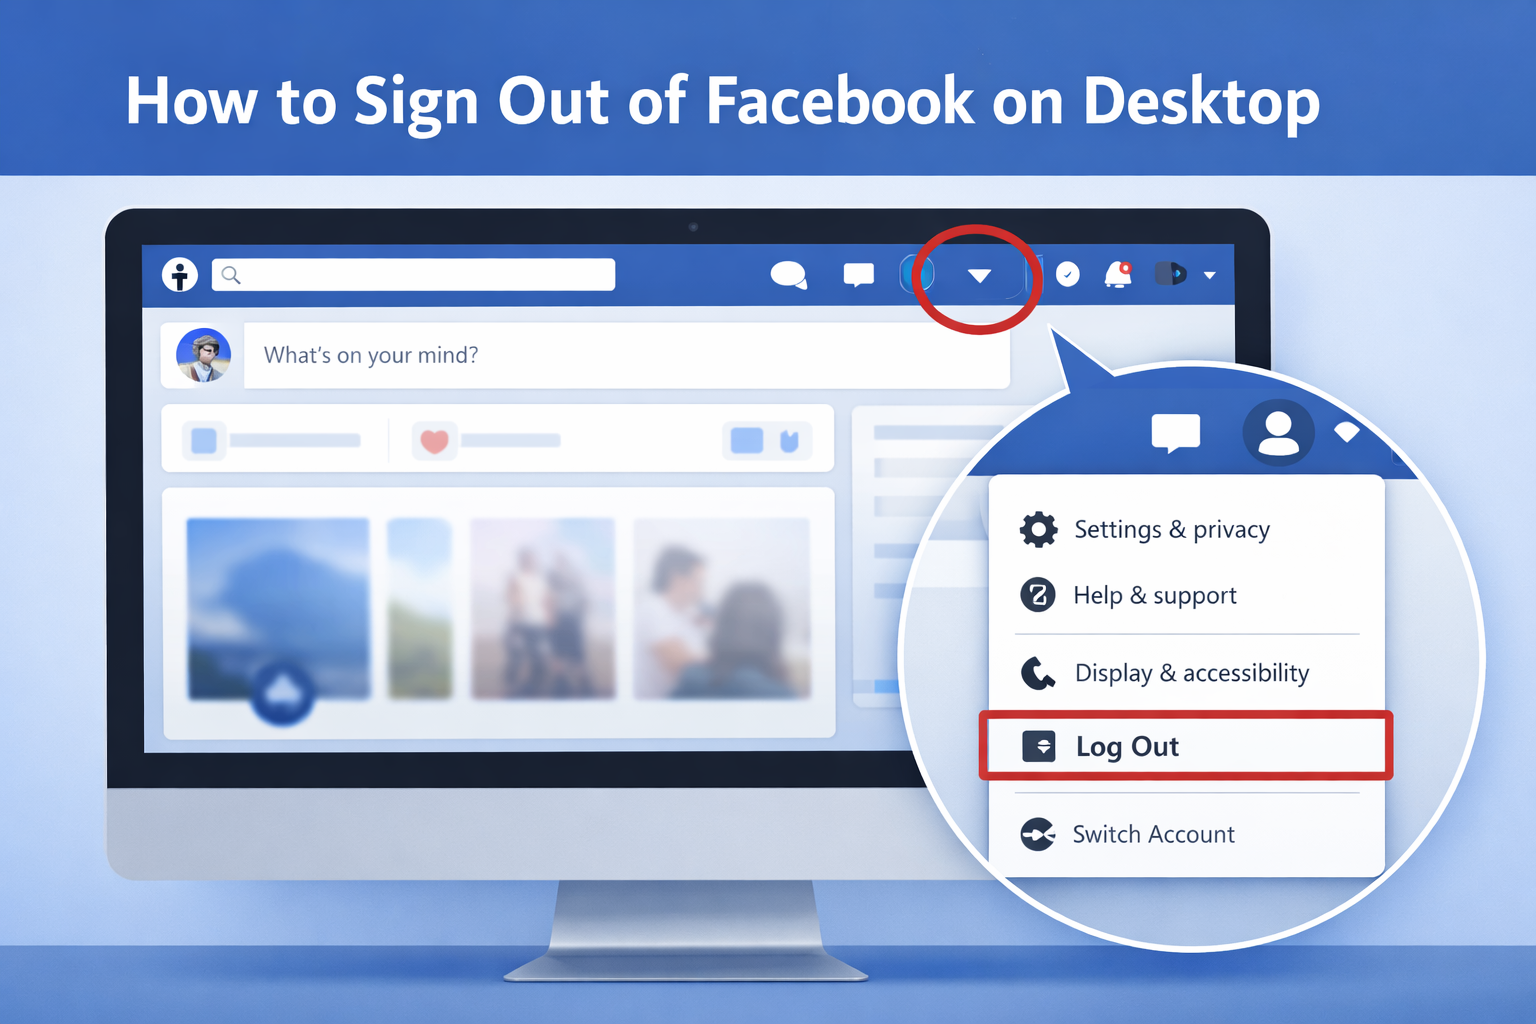
Likeprovider Blog - SMM Panel News, Updates & Guides | Likeprovider.net

Likeprovider Blog

Latest news, updates, and tips about social media marketing

How to Use Telegram Without a Phone Number (Complete 2025 Guide)

How to Use Telegram Without a Phone Number (Complete 2025 Guide)

In today’s digital world, concerns around privacy and security are stronger than ever. Because of this, many people wonder whether it’s actually possible to use Telegram without sharing a phone number. Telegram is known for its mix of fast messaging, strong encryption, and flexible features—but the platform usually requires a number to register, which can be a deal-breaker for those who want to stay a bit more anonymous.

The good news is that there are alternative ways to access Telegram without using your personal number. In this telegram without phone number guide, you’ll learn several practical methods that let you create or use an account without revealing your real line. Whether your goal is extra privacy, a cleaner separation between work and personal life, or simply avoiding spam, you’ll find helpful tips throughout this article.

Understanding Telegram's Single Account Requirement and Alternatives

Telegram is designed to link each account to a single phone number. This helps with verification, recovering access, syncing devices, and preventing spam accounts. But it also leads many users to look for different options—especially those who prefer not to share their personal number online.

Fortunately, using Telegram without a phone number is still possible if you rely on alternative verification methods. These solutions allow you to receive the login code without exposing your personal mobile line. Some common options include:

  1. Virtual Phone Services – Online tools that provide temporary or cloud-based numbers for verification.
  2. Landline Verification – Telegram can send a voice call to confirm your account.
  3. Using a Friend’s or Spare Number – A trusted friend or a secondary SIM can help with the initial setup.

Each method has its own advantages and drawbacks, so it’s important to choose the one that matches your privacy expectations and long-term usage needs.

Methods to Create a Telegram Account Without a Phone Number

Setting up a Telegram account without using your personal phone number might sound complicated at first, but there are actually several practical ways to do it. One of the most common approaches is taking advantage of virtual or temporary phone number services, where you can receive verification codes without exposing your real line.

Some users also prefer using Telegram through the desktop app or Telegram Web, especially when they want to stay more anonymous. This naturally leads to the question many people ask: how to register Telegram without a phone number. If privacy is your priority, exploring these options can be incredibly helpful.


Key Considerations

Before diving into the different methods of using Telegram anonymously without a phone number, it’s important to understand the potential trade-offs. While these alternatives can help you stay more private, each method comes with its own pros and cons—especially when it comes to reliability and long-term account security.

That said, choosing to access Telegram without a phone number is still a valid solution for anyone who prefers not to share their main contact information or simply wants an extra layer of separation for personal messaging.

Using Virtual Phone Numbers for Telegram Registration

Virtual phone numbers have become one of the most popular choices for creating a Telegram account without phone number verification. These numbers—available through specialized apps and websites—provide a convenient, privacy-friendly alternative to using your primary SIM.

They work by allowing you to receive the SMS or voice code required during registration. However, it's important to stay cautious. Not all virtual number providers are equally reliable, and some may fail to deliver verification messages on time. Taking a moment to check reviews or confirm a service’s credibility can save you from registration issues later.

Exploring Temporary Phone Number Services for Telegram Access

In today’s digital landscape, using a temporary phone number to access Telegram has gained traction. These services allow users to register or verify accounts without revealing their personal information. However, the choice of service can greatly affect your experience. Therefore, it’s essential to consider factors like reliability, cost, and ease of use. A few popular options include:

  1. Service X: Offers competitive pricing and a user-friendly interface.
  2. Service Y: Renowned for its quick delivery of numbers.
  3. Service Z: Provides multiple country options, increasing flexibility.

Exploring these options may reveal more about how to use Telegram without a phone number, as some services offer additional tips to enhance privacy.

If you want to explore Telegram’s official policies and verification rules in more detail, you can also check the guidelines on the Telegram FAQ page.

Setting Up Telegram on Multiple Devices Without a Phone Number

To enjoy the benefits of Telegram on various devices, you may wonder how to use Telegram without a phone number. Fortunately, there are a few methods available. First, you might consider using the Telegram desktop app, allowing for device syncing where you can log in without needing a traditional phone setup. However, bear in mind that an initial connection to the app using a phone number is still required. Therefore, explore the app settings to familiarize yourself with alternative verification techniques. This way, you can extend your messaging capabilities to several platforms comfortably.


Privacy Considerations When Using Telegram Without a Phone Number

While exploring how to use Telegram without a phone number, privacy remains a paramount concern. By bypassing the phone number verification, users often rely on alternative registration methods, which could introduce potential risks. For instance, while some methods may enhance anonymity, they could also lead to unexpected data exposure. Therefore, it's vital to be aware of the implications, including possible tracking and data leaks, which could impact overall security on the platform.

Key Privacy Factors

Factor      Impact
Anonymity      Varying degrees of exposure depending on method
Data Security      Potential risk of leaks with third-party apps

Troubleshooting Common Issues When Using Telegram Without a Phone Number

Using Telegram without a phone number can present various challenges. If you find yourself facing issues, consider these tips:

  1. Account Verification: Ensure that your account is properly set up, as verification might require alternative methods, like an email.
  2. Contact Syncing: Sometimes, syncing issues arise. Make sure your contacts are correctly imported from your existing accounts.
  3. Notification Problems: If you miss messages, check your notification settings; they may not be enabled for your account type.

These steps can help clarify some common hurdles, allowing you to enjoy the app more seamlessly.

Conclusion

In conclusion, learning how to use Telegram without a phone number opens up a world of possibilities for staying connected while maintaining your privacy. This guide has outlined various methods, explaining how simple steps can help you create an account securely and effectively. Although some options may require a bit more effort, the benefits of anonymity and accessibility make it worthwhile. Whether you’re looking to chat, share files, or join groups, exploring these techniques allows you to enjoy Telegram's features without the need for a phone number. Embrace these strategies, and experience a more private messaging journey.

If you’re looking to grow your Telegram community while setting up your account, you can also take a look at our detailed guide on free Telegram members here.

قراءة المزيد
How to Change Instagram Password (Step-by-Step & Updated 2025 Guide)

How to Change Instagram Password (Step-by-Step & Updated 2025 Guide)

In today’s digital world, keeping your online accounts secure is more important than ever. Updating your Instagram password regularly helps strengthen your privacy, protect your data, and prevent unauthorized access. This guide explains How to Change Instagram Password in a simple, human-friendly way—whether you're using a phone or computer.
If you're ready to update your password safely and quickly, follow the step-by-step instructions below.

1. Understanding the Importance of a Strong Instagram Password

A strong Instagram password acts as your first shield against unwanted access. With online threats constantly evolving, choosing a secure password is essential for protecting your personal information. When changing your password, keep these factors in mind:

  1. Length: Longer passwords are harder to guess.
  2. Diversity: Use a mix of letters, numbers, and special symbols.
  3. Uniqueness: Don’t reuse the same password across different platforms.

Because of this, knowing How to Change Instagram Password is crucial for long-term safety. Whether you want to Change Instagram Password easily or learn How to Change Instagram Password on mobile, taking action early can prevent potential risks.

2. Step-by-Step Guide to Resetting Your Password on Instagram

Changing your password on Instagram only takes a moment. Open the Instagram app and tap the “Forgot password?” option—Instagram will guide you through recovery steps based on your email or phone number.

If you're asking How to Change Instagram Password without old password, Instagram allows you to verify your identity using the contact details linked to your account.
For users already logged in, you can also update your password through the settings menu.
No matter which method you choose, updating your password regularly is a smart way to boost your account security.


3. Utilizing Two-Factor Authentication for Enhanced Security

Two-factor authentication (2FA) is one of the most effective ways to strengthen your online protection. By requiring a second verification step—such as a code sent to your phone—it adds an extra safeguard beyond your regular password. Although some users may find this extra step slightly inconvenient, the security benefits are far greater than the minor effort it takes.

If your goal is to keep your account fully protected, enabling 2FA is a smart and proactive move. It’s especially valuable when thinking about how to change Instagram password securely and maintain long-term account safety.

Conclusion

In short, enabling two-factor authentication not only improves your security but also gives you peace of mind. This additional layer becomes even more important during key moments such as learning how to change Instagram password and managing your personal data responsibly.

4. Common Mistakes to Avoid When Changing Your Instagram Password

Changing your Instagram password is an important part of account safety, but many users unknowingly make simple mistakes along the way. One common issue is choosing a weak or predictable password, which makes unauthorized access much easier.

Another frequent mistake is forgetting to log out from other devices after updating your password—this can leave your account exposed. Additionally, many users skip updating their recovery email or phone number, which causes problems if they ever need to reset their password again.

To ensure everything goes smoothly, stay aware of these pitfalls and take a few extra moments to double-check your settings.

5. How to Recover Your Account If You Forget Your Password

If you ever get locked out of your Instagram account, don’t worry—there are several ways to regain access. Start by visiting the login screen and tapping the Forgot Password option. Instagram will ask for your email, username, or phone number to verify your identity.

You’ll then receive an email containing a recovery link or instructions. Make sure to check your spam folder if the email doesn’t appear right away.
If your Instagram is connected to another service (such as Facebook), recovery may be even faster. Keeping your recovery details updated ensures you always have a reliable way back into your account.

6. Best Practices for Managing and Storing Passwords Safely

Keeping your passwords secure is essential for protecting your online accounts. A simple way to stay safe is by using password managers, which can create and store strong, complex passwords on your behalf. Whenever possible, make sure to enable two-factor authentication for an extra layer of protection.

You should also avoid passwords that can be easily guessed—such as birthdays, pet names, or common words. Regularly updating your passwords is a smart habit, even if many people wonder how often it’s necessary. In reality, stronger and frequently refreshed passwords greatly reduce the chances of unauthorized access or potential data breaches.


How to Change Instagram Password (Quick Steps)

  1. Open Instagram on your phone or desktop.
  2. Go to Profile → Menu → Settings → Accounts Center.
  3. Tap Password and Security.
  4. Select Change Password.
  5. Enter your current password, then create a new, strong password.
  6. Tap Save to update.

If you don’t remember your old password, use “Forgot Password?” on the login screen and reset it via email or phone.

If you need additional guidance during the process, you can also check Instagram’s official Help Center article for password assistance here.

Conclusion

Changing your Instagram password is a simple but powerful step toward improving your account’s security. By following the methods in this guide, you ensure that your personal information stays protected and harder to compromise. Updating your password regularly also helps prevent unauthorized logins and strengthens your digital safety overall.

At the end of the day, understanding how to change Instagram password gives you better control over your online presence and supports safer social media habits. Stay proactive, choose a password that’s strong yet still easy for you to remember—and difficult for others to guess. By doing this, you can use Instagram with more confidence and peace of mind.

If you want to improve your Instagram visibility while securing your account, you can also check out our guide for free Instagram story views.

قراءة المزيد
How to Schedule Instagram Posts (2025 Guide for Beginners)

How to Schedule Instagram Posts (2025 Guide for Beginners)

In today’s fast-moving digital world, staying consistent on Instagram is harder than it looks. Most people want to post regularly but simply don’t have the time to create and share content every single day. That’s exactly why learning how to schedule Instagram posts has become such a valuable skill. When you know how to prepare your content ahead of time, you free yourself from daily posting pressure and make sure your audience always sees something fresh from you.

Scheduling your Instagram posts also gives you more control over when your content goes live. Instead of posting randomly, you can plan for the moments when your audience is most active. With this approach, you get better engagement, stronger visibility, and a smoother workflow overall. Whether you’re building a personal brand, running a small business, or simply trying to grow your online presence, scheduling tools make everything easier and more organized.

Understanding the Importance of Scheduled Posts for Instagram Growth

Consistency is one of the biggest factors behind Instagram growth. When you understand how to schedule Instagram posts properly, you remove the guesswork and create a reliable posting rhythm. That reliability helps your audience remember you, interact with your content more often, and ultimately trust your brand. Posting in advance isn’t just convenient—it directly impacts your reach and engagement.

Here’s why scheduling is so powerful:

  1. Consistency: A steady posting routine keeps your followers interested and increases your chances of appearing in their feeds.
  2. Better Time Management: Instead of rushing to create content at the last minute, you can prepare everything when you’re focused and inspired.
  3. Stronger Planning: Scheduling makes it easier to build cohesive themes, campaigns, and content strategies.

When you learn how to schedule Instagram posts for business, you can shape a more professional, curated profile that speaks directly to your target audience. This not only builds trust but also strengthens your brand identity and helps you grow steadily over time.


Guide to Using Instagram Scheduling Tools

Scheduling tools can make your entire Instagram workflow faster and far more organized. Start by picking a tool that matches what you need—some offer advanced analytics, while others focus purely on simple scheduling. Once you’ve chosen your platform, upload your photos or videos and write your captions just like you normally would.

When learning how to schedule Instagram posts using apps, make sure you’re selecting times when your audience is usually active. This small detail can noticeably boost engagement. It also helps to pair your posts with the right hashtags to reach new viewers. After your content goes live, check your analytics to see what performed well. These insights will guide you toward how to schedule Instagram posts for maximum engagement in the future..

How to Do It: Step-by-Step Breakdown

Learning how to schedule Instagram posts is simple once you understand the process. Here’s a clear, actionable guide that anyone can follow:

1. Choose a Scheduling Tool That Fits Your Needs

Start by selecting a platform like Meta Business Suite, Later, Buffer, or any app you prefer. Each tool offers different features such as analytics, auto-posting, hashtag suggestions, or drag-and-drop planners. Pick the one that makes your workflow easier.

2. Upload Your Photos or Videos

After choosing your tool, upload the content you want to schedule. Make sure your visuals are high quality, on-brand, and sized correctly for Instagram feed, reels, or carousel posts.

3. Write Your Caption and Add Hashtags

Craft a caption that feels natural and engaging. Add relevant hashtags to boost discoverability. Most scheduling tools let you save hashtag groups — use that to save time.

4. Select the Date and Time to Publish

This is the core part of learning how to schedule Instagram posts. Choose a posting time when your audience is most active. If you’re unsure, check your Instagram insights to find out when your followers are online.

5. Preview Your Post Before Scheduling

Look at the final preview to make sure your caption, spacing, emojis, and images look exactly how you want them to appear on Instagram.

6. Hit Schedule and Let the Tool Handle the Rest

Once you tap “Schedule,” your post is fully automated. No need to log in or manually publish at a specific time — the tool will do it for you.

7. Track Analytics After the Post Goes Live

After your scheduled posts are published, monitor reach, likes, saves, comments, and impressions. This helps you refine the strategy and understand which times and formats perform best.

Best Practices for Crafting Engaging Instagram Content Ahead of Time

If you want your posts to stand out, planning ahead is essential. Knowing how to schedule Instagram posts isn’t just about timing—it’s also about crafting content that feels intentional and cohesive. Use planning tools to map out your visual style and message so your feed has a consistent look.

Think about themes, trending topics, or recurring formats that your audience connects with. At the same time, stay flexible so you can adapt to new trends. Captions that feel genuine paired with strong visuals can dramatically improve engagement, helping you build a deeper connection with your audience.

Tips for Scheduling

Make it a habit to review your old posts to spot patterns—what time performs best, which format gets the most interaction, and which topics your audience prefers. Becoming good at how to schedule Instagram posts takes a bit of practice, but once you get into the routine, you’ll notice more consistent engagement and a smoother content strategy overall.

Planning is important, but don’t forget to adjust your schedule based on real-time feedback and analytics. The more you refine your approach, the easier it becomes to keep your Instagram presence strong and consistent.

How to Analyze Performance Metrics of Scheduled Instagram Posts

To understand how well your scheduled Instagram posts are performing, start by reviewing the core engagement signals. Check the likes and comments first—these give you a quick sense of how people are reacting to your content right away. After that, look at reach and impressions to see how widely your posts are being shown over time.

It’s also useful to compare different posting times and content formats to spot what your audience responds to most. This kind of data isn’t just for measuring success; it also helps you adjust and improve your future scheduling strategy. The more you study your analytics, the easier it becomes to refine how you schedule Instagram posts for stronger results.

If you’re trying to boost your visibility even further while planning your content, you can also check out our guide on free Instagram shares to strengthen your overall engagement strategy.


Tips for Aligning Your Instagram Strategy with Seasonal Trends

Seasonal trends can give your Instagram strategy a major boost if you use them the right way. Take some time to look at older posts or past campaigns to see how content performed during specific seasons. This helps you understand what your audience cares about at different times of the year.

Using seasonal hashtags can also increase visibility and attract users who are actively searching for timely topics. Just make sure you stay true to your brand’s style and voice while incorporating trending ideas. Blending in with seasonal content is great for reach, but authenticity is what keeps your audience engaged in the long run.

Conclusion

Mastering how to schedule Instagram posts gives you more freedom, more consistency, and more impact on your social media presence. With the right tools and a clear plan, you can keep posting regularly without feeling overwhelmed by daily content tasks.

Scheduling your posts also allows you to be more creative—you can try new ideas, experiment with different formats, and stay ahead of trends while still maintaining a polished, organized feed. So go ahead and build your schedule, trust your analytics, and enjoy the benefits of a streamlined Instagram strategy that grows and engages your audience over time.

If you need official guidance while learning how to schedule Instagram posts, you can also check the detailed instructions on the Meta Business Help Center for the most up-to-date information.

قراءة المزيد
Optimal Instagram Posting Time: The Best Hours to Post for Maximum Engagement

Optimal Instagram Posting Time: The Best Hours to Post for Maximum Engagement

In today’s digital world, social media has become one of the strongest channels for connecting brands with their audiences. Knowing the optimal instagram posting time can make a noticeable difference in your engagement and overall visibility. Many studies show that sharing your posts at the right moment leads to higher interaction rates and better reach.
Because of this, understanding when your followers are most active is essential if you want to get the most out of Instagram. In this article, we’ll break down practical strategies to pinpoint the best posting hours and share helpful insights for both individuals and businesses looking to strengthen their online presence.

Understanding Audience Behavior: Analyzing Peak Engagement Times

Truly connecting with your audience starts with understanding their activity patterns. Taking the time to analyze when they are online the most can reveal your ideal optimal instagram posting time. Research consistently shows that engagement levels shift depending on factors like age, interests, and even where your audience is located.
With that in mind, applying the following optimal instagram posting time tips can make identifying those high-engagement moments much easier:

  1. Time Zones: Always consider where your audience is based and when they are most likely to be active.
  2. Content Type: Each type of post—Reels, photos, carousels—can perform differently at different hours.
  3. Analytics Tools: Use insights and analytics to spot the times when your posts consistently receive the strongest interactions.

Ultimately, finding the best optimal instagram posting time isn’t a one-time task—it changes as your audience grows and your content evolves. But once you understand those patterns, you can significantly increase your visibility and strengthen your Instagram presence.


The Impact of Time Zones on Instagram Engagement: A Global Perspective

Time zones play a much bigger role in Instagram engagement than most people realize, which is why optimal instagram posting time analysis is so important. To maximize your reach, you need to understand when your audience is actually online—especially if they’re spread across multiple regions. People in different parts of the world scroll at different hours, and this directly affects how your posts perform.

By learning how to find optimal instagram posting time, brands can shape their posting strategy with far more precision. For companies, identifying the optimal instagram posting time for businesses can lead to stronger interactions and even better conversion rates, ultimately building a smoother and more connected digital experience.

Utilizing Instagram Insights: Tools to Determine Your Optimal Posting Time

Knowing your audience’s behavior is essential when aiming for higher engagement. With Instagram Insights, you get a clear view of when your followers are most active. The tool breaks down activity by day and hour, helping you spot patterns that point to your optimal Instagram posting time.

Trying out various posting hours can uncover consistent viewer habits and help you understand what your audience responds to best. Use this information to fine-tune your strategy so you can consistently hit that ideal posting window—boosting both visibility and interaction at the moments that matter the most.

Strategic Scheduling: Creating a Posting Calendar for Consistent Engagement

Establishing a systematic approach to your content strategy is vital for achieving consistent engagement. A well-crafted posting calendar helps identify the optimal Instagram posting time, allowing you to reach your audience when they are most active. Consider plotting your schedule based on audience insights, peak engagement hours, and even seasonal trends. Regularly review analytics and adjust your calendar accordingly to keep your strategy fresh and relevant while ensuring maximum visibility.

Influence of Content Type on Optimal Posting Times: What Works Best?

Having a structured and reliable content plan is one of the easiest ways to maintain strong engagement. A smartly organized posting calendar helps you pinpoint your optimal Instagram posting time, allowing you to share content exactly when your audience is most active.

When planning, consider your audience insights, peak engagement hours, and even seasonal behavior patterns. Keep reviewing your analytics and adjusting your schedule as needed. This ensures your posting strategy stays fresh, relevant, and aligned with the times your content is most likely to be seen—helping you maintain maximum visibility over the long term.

you want to explore Instagram’s own recommendations, you can also check the official Instagram Help Center for additional tips and platform guidelines.


Conclusion

In summary, finding the optimal Instagram posting time can noticeably improve your engagement and help you build a stronger connection with your audience. When you understand your followers’ behavior and pay attention to factors such as time zones and peak activity periods, you can shape your content strategy for far better results.

It’s important to remember that there isn’t a universal formula that works for everyone. Testing different posting times and reviewing your engagement data will give you the clearest insights into what resonates with your audience. Stay flexible, keep refining your timing, and use each post as an opportunity to improve.

Ultimately, succeeding on Instagram is about creating meaningful, consistent interactions with your followers—interactions that feel natural, timely, and genuinely engaging.

If you want a quick engagement boost before posting, you can try getting free Instagram likes to increase your visibility.

قراءة المزيد
How to Hide Facebook Friends List (Quick & Easy 2025 Guide)

How to Hide Facebook Friends List (Quick & Easy 2025 Guide)

In today’s digital age, privacy has become a priority for many users on social media platforms, including Facebook. You may wish to limit who can see your connections and maintain control over your personal information. This guide will explore How to Hide Facebook Friends List effectively. Whether you want to adjust the settings to keep your friends list private from the general public or just from specific people, we’ll provide you with quick and easy steps to ensure your online presence stays secure. Understanding the different options available for How to Hide Facebook Friends List completely or even just on your profile can help you navigate your privacy with confidence.

Understanding the Importance of Privacy on Facebook

In today's digital world, safeguarding your privacy on platforms like Facebook is crucial. Many users often overlook how their personal information can be accessed by others. Therefore, understanding How to Hide Facebook Friends List from others becomes vital to maintaining control over your connections. You may wonder, what are the steps involved? Additionally, knowing How to Hide Facebook Friends List on mobile is equally important, especially as mobile usage increases. Adjusting your How to Hide Facebook Friends List settings ensures only trusted individuals access your details.

Step-by-Step Guide to Accessing Your Friends List Settings

To adjust your privacy on Facebook, start by navigating to your profile. Click on your profile picture and select the ‘Friends’ tab. Here, you’ll see options for adjusting visibility. If you're wondering How to Hide Facebook Friends List from specific people, select 'Edit Privacy.' For those interested in How to Hide Facebook Friends List completely, choose 'Only Me.' This allows you to control who sees your connections. Alternatively, learn How to Hide Facebook Friends List on profile by adjusting settings under 'Privacy Shortcuts.'

How to Hide Facebook Friends List (Step-by-Step Instructions)

Hiding your Facebook friends list is a simple way to protect your privacy and limit who can see your social connections. Whether you want more control over your personal information or you simply prefer a more private profile, the steps below will help you update your settings quickly and easily.

1. Open Facebook and Go to Your Profile

Start by opening the Facebook app or visiting Facebook on your browser. Tap your profile photo in the top-right corner to access your personal page.

2. Navigate to “Settings & Privacy”

Tap the Menu (three horizontal lines), scroll down, and select Settings & Privacy, then choose Settings.

3. Go to the “Privacy” Section

Inside Settings, locate and tap Privacy. This is where Facebook stores all visibility and audience controls for your posts, profile, and friends list.

4. Find “Who Can See Your Friends List?”

Scroll until you find the option labeled “Who can see your friends list?”
This setting determines whether everyone, friends, or only you can view your full list.

5. Choose Your Preferred Privacy Setting

Select one of the following:

  • Only Me → completely hides your friends list
  • Friends → only your Facebook friends can see it
  • Specific Friends → show it only to selected people
  • Custom → create your own visibility rules

For maximum privacy, choose “Only Me.”


6. Save and Exit

Once you select the option you prefer, Facebook saves it automatically. Your friends list is now hidden based on your chosen setting.

Adjusting Your Privacy Settings: Who Can See Your Friends List

Updating your privacy settings is one of the simplest ways to take control over who can view your personal information on Facebook. If you want to keep your social connections more private, learning How to Hide Facebook Friends List is a great starting point. Facebook gives you several options, allowing you to limit visibility to only friends, specific groups, or even just yourself.

This flexibility makes it easy to protect certain connections, but it’s also good to remember that some people may still see mutual friends depending on their own settings. For that reason, it’s helpful to review your privacy preferences from time to time to make sure they match the level of visibility you’re comfortable with.

Utilizing Custom Friend Lists for Enhanced Privacy

Custom friend lists offer an extra layer of control when it comes to your privacy on Facebook. By creating personalized groups, you can decide exactly who sees certain posts, stories, or updates. This allows you to share more personal content with close friends while keeping it hidden from others, giving you a better sense of security.

Managing these lists can feel a bit confusing at first, especially if you have many connections, but once you organize them, the benefits are huge. You gain clearer control over your audience, reduce accidental oversharing, and create a more intentional, private experience on the platform.

How to Limit Your Friends List Visibility for Specific Audiences

If you're wondering how to hide Facebook friends list from certain people, the process is quite straightforward. Start by navigating to your privacy settings, where you can customize who sees your friends list. Here, you can select options like "Only Me" for complete privacy or choose specific audiances for a more tailored approach. However, remember that even with these settings, mutual friends may still be visible to others. Therefore, consider each selection carefully.

For official instructions, you can also visit the Facebook Help Center.

Troubleshooting Common Issues When Hiding Your Friends List

When attempting to hide your friends list, users may encounter several common issues. Firstly, ensure that your privacy settings are correctly configured; sometimes new updates can reset these preferences unexpectedly. Furthermore, if your friends are still visible to others, it's possible that some might have their settings allowing the visibility of mutual friends. Always double-check visibility settings, and remember, these can often change without notice on social platforms.


Conclusion

In conclusion, learning how to hide your Facebook friends list gives you more control over your privacy and helps you manage how much of your profile others can see. Once you understand where the settings are and how they work, adjusting them becomes incredibly straightforward.

Taking a moment to update these options allows you to decide exactly who can view your social connections, creating a more comfortable experience on the platform. At the end of the day, your Facebook account should match the level of privacy you prefer. With just a few quick changes, you can protect your personal space and share your friends list only with the people you truly want.

If you’re looking for the best social-media growth tools, you can also check out our best SMM panel for fast and reliable services.

قراءة المزيد
How to Delete Pinterest Pins (Quick & Easy 2025 Guide)

How to Delete Pinterest Pins (Quick & Easy 2025 Guide)

Managing your Pinterest account doesn’t have to feel overwhelming—especially when it comes to organizing your boards and removing pins you no longer need. Learning How to Delete Pinterest Pins makes the entire process much simpler. Whether you want to clean up a specific board, remove old ideas, or delete pins directly from your mobile device, having a clear guide saves a lot of time and frustration.

This walkthrough is designed to give you straightforward, beginner-friendly steps so you can delete pins individually or in bulk—without affecting followers or disrupting your Pinterest aesthetic. Let’s dive in and make the process quick, clean, and stress-free.

Understanding the Pinterest Interface: Navigating to Your Pins

Pinterest is generally easy to use, but if you're new to managing boards and pins, the interface can feel a little confusing at first. All your pins appear on your profile page, organized inside the boards you’ve created.

To start managing them, simply head to your Boards section. Once there, you’ll see options to delete pins from a specific board, remove multiple pins at once, or even handle cleanup directly from your phone.

If you're trying to figure out How to Delete Pinterest Pins from your board or How to Delete Pinterest Pins on mobile, the process usually takes just a couple of taps. And for those who want to know How to Delete Pinterest Pins permanently, the deletion settings are available within each board—though they may be slightly hidden if you haven't used them before.

Steps to Access Your Pins:

  1. Log in to your account.
  2. Select your profile icon.
  3. Go to 'Boards' for a comprehensive view.
  4. Choose the specific board containing your Pins.

Step-by-Step Guide: Removing Pins from Your Boards

Cleaning up your Pinterest boards might feel overwhelming at first, but removing unwanted pins is actually very simple once you know where to start. Begin by choosing the pins you no longer want to keep. From there, you can use the How to Delete Pinterest Pins in bulk feature if you want a faster, more efficient cleanup—especially helpful if your boards are packed with old content.

If you're worried about your followers, don’t stress. You can safely explore How to Delete Pinterest Pins without losing followers, because deleting pins doesn't affect your audience at all. For a smoother experience, learning How to Delete Pinterest Pins easily can save time while helping you maintain a clean, organized Pinterest profile.


Troubleshooting Common Issues: What to Do if You Can't Delete a Pin

If you’re having trouble deleting a pin, there are a few quick fixes that usually solve the problem. First, double-check that your Pinterest app is updated to the latest version or try restarting your device. Slow internet connections can also interrupt the deletion process, so switching networks may help.

If the issue continues, make sure the pin isn’t part of a shared board—these boards may have restricted permissions that prevent you from deleting certain content. Adjusting permissions or contacting the board owner can often resolve the issue.

How to Delete Pinterest Pins step by step

Go to the pin you want to remove.

Tap or click the three dots (…) in the top-right corner.

Select “Edit Pin” or “Delete” depending on your device.

If the delete button doesn’t appear, refresh the page or try again from the board view.

For persistent issues, searching How to Delete Pinterest Pins online can provide additional troubleshooting tips.

For official instructions, you can also visit the Pinterest Help Center.

Conclusion

In conclusion, mastering How to Delete Pinterest Pins is a straightforward and empowering process that helps you keep your boards clean, organised, and aligned with your current interests. Whether you're removing outdated ideas or simply tidying up your saved content, the steps are quick, intuitive, and easy to follow.

Every time you curate your boards, you’re not just decluttering—you’re shaping a more inspiring Pinterest space for yourself. That’s why revisiting your boards from time to time and applying How to Delete Pinterest Pins effectively can make a noticeable difference in your overall experience.

With these clear insights, you’ll confidently know How to Delete Pinterest Pins whenever needed, allowing you to manage your Pinterest account more efficiently and enjoy a cleaner, more personalised feed. Happy pinning!

If you need fast and affordable social-media services, you can also check out our cheap SMM panel for reliable growth.

قراءة المزيد
How to Delete Pinterest Account (Quick & Easy 2025 Guide)

How to Delete Pinterest Account (Quick & Easy 2025 Guide)

If you’ve decided it’s time to step away from Pinterest, you’re definitely not alone. Many users eventually feel the need to take a break from the platform as their interests shift or their online habits change. This How to Delete Pinterest Account guide will walk you through the process in a simple, stress-free way so you can close your account confidently and without confusion.

Main Points

This guide covers the key things you need to know before deleting your Pinterest account. You’ll learn how to navigate the correct settings, what happens to your boards and pins after deletion, and how you can back up your content before taking action.

We’ll also clarify the difference between temporarily disabling your account and permanently deleting it—two options that have very different outcomes.

By following this Quick Guide to Delete Pinterest Account, you’ll be able to close your account smoothly and make the transition away from Pinterest as comfortable as possible.

Understanding the Consequences of Deleting Your Pinterest Account

Before you proceed with How to Delete Pinterest Account steps, it’s important to understand what deleting your account actually means. Once your account is removed, you’ll permanently lose access to your saved pins, boards, followers, and all curated content.

Some users later regret losing years of collected ideas and inspirations, so it’s worth considering whether you might prefer a temporary deactivation instead. Still, for many people, clearing out old digital accounts can feel refreshing and beneficial—especially when aiming to simplify and declutter their online presence.


Key Consequences to Consider

Before moving forward, it’s important to understand a few key consequences that come with deleting your Pinterest account:

  1. You permanently lose all personal content, including boards, pins, and saved ideas.
  2. Your profile disappears completely, along with any interactions you’ve had on the platform.
  3. If you ever decide to return, recovering your old account or data may not be possible.

Because of these factors, taking a moment to reflect on the Delete Pinterest Account Steps 2025 is essential before finalizing your decision. Once the deletion process begins, reversing it can be extremely difficult—sometimes impossible. Make sure you’re completely certain about your choice.

If you’re still weighing your options, this Quick Guide to Delete Pinterest Account can help you gain clarity and move forward with confidence.

How to Delete Pinterest Account (Step-by-Step Instructions)

Deleting your Pinterest account is a straightforward process once you know where to look. Below is a clear, user-friendly breakdown to help you complete the steps smoothly—whether you’re doing it from your phone or desktop.

1. Open Pinterest and Log In

Start by opening the Pinterest app or visiting the Pinterest website on your browser. Make sure you’re logged in to the account you want to remove.

2. Go to Your Account Settings

Tap your profile icon, then open Settings. This is where Pinterest stores all your privacy, security, and account options.

3. Navigate to “Account Management”

Inside the settings menu, locate the Account management section. This is the area that controls deactivation, deletion, and personal data.

4. Select “Delete Account”

Scroll until you find the Delete account option. Pinterest will show a brief explanation of what will happen when your account is removed—including the permanent loss of boards, pins, and saved data.

5. Confirm Your Decision

Pinterest will ask you to confirm that you want to delete your account. You may also be asked to provide a reason. Once confirmed, Pinterest sends a verification email to ensure the request is genuine.

6. Verify Through the Email

Open the email you receive from Pinterest and click the confirmation link. This final step triggers the deletion process.

7. Account Enters 14-Day Deactivation Period

After confirmation, your account enters a 14-day recovery window. During this period, your account is deactivated but not yet fully deleted.
If you log in again within these 14 days, Pinterest will automatically restore your account.

8. Permanent Deletion

If you do not log in during the recovery period, your account will be permanently deleted. All pins, boards, followers, and profile data are removed and cannot be recovered.

A Step-by-Step Guide to Backing Up Your Pinterest Data Before Deletion

Before you dive into How to Permanently Delete Pinterest Account, it’s smart to back up your important content. Many users have pins they’ve curated for years—recipes, home ideas, designs, inspirations—and losing them unexpectedly can be disappointing.

Start by downloading your Pinterest data directly from your account settings. This ensures you keep all essential visuals and the inspiration you’ve saved over time. You may also want to organize your downloaded files so that they’re easier to browse later.


Backing Up Your Pins

To properly back up your content, list out the boards that matter most to you and make sure they’re included in your download request. After downloading, double-check that the files are complete and accessible.

Keep in mind that, as you navigate the Pinterest Account Deletion Guide 2025, some content may not transfer perfectly or may require manual sorting afterward. This makes a careful, comprehensive backup even more important.

Step    Action
1    Navigate to Account Settings
2    Request Data Download
3    Organize Downloaded Files

Once you’ve finished backing up everything important, you’ll feel much more confident about moving forward. Knowing that your boards, pins, and saved ideas are safely stored makes the decision easier—whether you choose the Easy Ways to Delete Pinterest Account 2025 or prefer a different path. Having your data protected gives peace of mind during the transition.

Conclusion

Choosing to step away from Pinterest can feel freeing, especially if you’re simplifying your digital life or shifting your online habits. Fortunately, the deletion process is much easier than most people expect. By following the steps outlined in this guide, you’ve equipped yourself with everything necessary to complete the process smoothly and without confusion.

Remember, deleting your account doesn’t have to feel overwhelming—it’s simply a matter of deciding what works best for you. And if you ever change your mind later on, you can always create a new account and return to the platform.

Understanding how to delete your Pinterest account with this quick and easy 2025 guide gives you full control over your online presence. Wishing you clarity, confidence, and a fresh start as you begin this next chapter!

For more details on account management, you can also visit the official Pinterest Help Center.

Frequently Asked Questions

Can I temporarily deactivate my Pinterest account instead of deleting it?

Yes, Pinterest allows you to temporarily deactivate your account. This option lets you take a break without losing your pins and boards.

Will deleting my Pinterest account remove all my pins and boards?

Yes, if you delete your Pinterest account, all your pins, boards, and data will be permanently removed and cannot be recovered.

What happens to my followers if I delete my Pinterest account?

If you delete your Pinterest account, you will lose all your followers as your profile and content will no longer be available on the platform.

If you’re looking for reliable social-media growth tools, you can also check out our trusted SMM panel for fast and high-quality services.

قراءة المزيد
How to Delete X Account (Permanently) – Step-by-Step Guide for 2025

How to Delete X Account (Permanently) – Step-by-Step Guide for 2025

In today’s digital world, many people feel the need to take more control over their online presence. Whether you’re trying to step back from social media or simply clean up your digital footprint, understanding how to delete x account permanently can be extremely helpful. In this guide, you’ll find the quickest and most reliable method for 2025, making the whole process straightforward and stress-free.

Leaving a platform might seem overwhelming at first, but when you know the correct steps, it becomes much easier to manage. Throughout this post, we’ll walk through different approaches, including how to delete x account on mobile and even how to delete x account without password, so you can fully remove your account along with any associated data. Let’s get started!

Understanding Account Deletion Policies on X

Before you begin learning how to delete x account permanently, it’s important to understand the platform’s specific rules around account removal. Many users find the process simple, but certain details can make things a bit confusing. For example, deleting an account doesn’t always happen immediately, and some users may be affected by the following conditions:

  1. Confirmation Period: X typically provides a grace period during which you can reverse your decision if you change your mind.
  2. Data Retention: Certain information may still be stored for compliance or security purposes.
  3. Purge Completeness: Even after deletion, parts of the account may remain traceable for a short time.

Knowing how to delete x account easily involves being aware of these rules, since following the correct steps helps ensure a smooth and hassle-free experience. To get the best results, it’s always a good idea to review how to delete x account step by step before making any final decisions.

Step-by-Step Guide to Permanently Deleting Your X Account

To understand how to delete x account permanently, start by opening the X app or website on your device. From there, head into the settings menu—its location may vary a bit depending on whether you’re using iOS, Android, or desktop. If you’re specifically trying to learn how to delete x account on mobile, you’ll usually find the option within the account section.

If you’ve forgotten your password, don’t worry—there may be a few extra steps, but the process is still manageable. As you move through the deletion prompts, make sure you confirm the removal of both your account and any stored data to ensure everything is cleared properly.


How to Delete Your X Account the Right Way

Deleting your X account is a simple process once you know where to look. Below is a clear, step-by-step overview to help you remove your profile safely and permanently.

Step 1 — Open Settings

Login to your X account and go to Settings and Privacy from the menu on your profile.

Step 2 — Access Account Controls

Select Your Account, where you’ll find options related to account management and privacy.

Step 3 — Choose Deactivate

Click Deactivate Account to begin the removal process. Review the information about what will be deleted.

Step 4 — Confirm Your Identity

Enter your password when prompted to verify that the account belongs to you.

Step 5 — Complete Deactivation

Confirm your choice. Your account will be deactivated immediately but not fully erased yet.

Step 6 — Permanent Deletion

If you do not sign in again within 30 days, your account and all associated data will be permanently deleted from X’s system.

For official instructions, you can also review the guidelines provided by Twitter Support.

Common Mistakes to Avoid When Deleting Your X Account

When researching how to delete your X account, it’s important to avoid common errors that could slow you down. Start by backing up any important data, since account deletion is often irreversible and some content can’t be restored afterward.

Another mistake users make is navigating the settings too quickly and only deactivating their account instead of deleting it completely. Additionally, check for any active subscriptions or third-party apps connected to your X account, as these can cause unexpected complications if not canceled before deleting the account.

What Happens After You Delete Your X Account: A Comprehensive Overview

Once you choose to delete your X account, the deletion process happens in stages, and understanding them can help avoid confusion. Your account typically enters a deactivation period first, meaning your profile becomes invisible to others even though your data isn’t gone yet.

Some account information may remain temporarily stored for security or compliance purposes, which is why a full purge isn’t always immediate. In most cases, it takes around 30 days for everything to be permanently removed. After that, the account is fully erased, often leaving users with both relief and a bit of curiosity about what data might still linger.

Key Points to Consider

  1. Deactivation: Your account is hidden but not fully deleted.
  2. Data Residuals: Certain information may still be retrievable for a while.
  3. Finality: After 30 days, most data is permanently erased, but check privacy settings.

Alternative Options: Deactivating vs. Permanently Deleting Your X Account

When thinking about your how to delete X account, it’s worth taking a moment to compare your choices. You can temporarily deactivate the account, which keeps your data intact in case you decide to come back later, or you can permanently delete it—an option that cannot be reversed.

Deactivation is ideal if you simply want a break from the platform without losing posts, messages, or media. On the other hand, full deletion removes everything tied to your account, so be sure you’re comfortable with that outcome before proceeding.


Conclusion

To wrap things up, removing your X account can be a simple and smooth experience as long as you follow the correct steps. By understanding how to delete x account the right way, you’ll ensure your data is fully and permanently cleared from the platform.

Keep in mind that deletion is irreversible, so it’s smart to pause and confirm your decision before moving forward. But once you’re ready, the instructions above will guide you through the process with confidence. With the proper approach, you’ll be able to take control of your online presence and manage your digital footprint exactly the way you want.

If you’re trying to grow your audience before deleting your profile, you can also check out our detailed guide on free twitter followers.

قراءة المزيد
How to Hard Reset iPhone (Works on All Models!)

How to Hard Reset iPhone (Works on All Models!)

In today’s digital world, being able to troubleshoot your own devices is more important than ever—especially when it comes to smartphones like the iPhone. Whether you’re using an iPhone 12, iPhone 8, or even the newest iPhone 13, performing a hard reset can often fix issues that make your device slow, frozen, or completely unresponsive. That said, it’s important to follow the right steps, since doing it incorrectly could potentially cause data loss.

This guide walks you through simple and effective ways to perform a hard reset on your device, no matter which model you own. So if you’re trying to figure out how to hard reset iPhone or exploring options like resetting without a password, you’ll find everything you need below. Let’s get your iPhone working smoothly again.

Understanding the Need for a Hard Reset on Your iPhone

At times, your iPhone might start behaving oddly, making you wonder if a reset could help. Knowing when a hard reset is actually needed can be extremely useful. For example, if your device is freezing, lagging, or certain apps keep crashing, a hard reset can often restore normal performance.

If you’re trying to learn how to hard reset iPhone 12 or looking for steps on how to hard reset iPhone 11, the process is especially helpful for troubleshooting. Even if you’ve forgotten your password, there are still methods on how to hard reset iPhone without password, giving your device a clean restart when necessary.

Step-by-Step Guide to Performing a Hard Reset on Various iPhone Models

A hard reset can resolve many common issues on your iPhone. For example, if you’re curious how to hard reset iPhone 8, all you need to do is quickly press and release the Volume Up button, then do the same with the Volume Down button. After that, hold the Side button until you see the Apple logo.

If you need to know how to hard reset iPhone X, the steps are almost identical. For the iPhone SE, the button combination is a bit different, but the overall process remains the same. Just make sure to follow each step properly, as the sequence slightly varies depending on the model.

Model     Hard Reset Steps
iPhone 8     Press Volume Up, Volume Down, then hold Side Button.
iPhone X     Same as iPhone 8.
iPhone SE     Hold both Power and Home buttons until Apple logo appears.

Common Scenarios When a Hard Reset is Necessary

There are plenty of situations where knowing how to hard reset iPhone 13 becomes genuinely useful. For example, if your device suddenly stops responding because of a software glitch, a quick hard reset can often bring it back to life. Likewise, when your iPhone starts acting unpredictably—such as apps crashing, freezing, or slowing down—a reset can sometimes fix these annoying problems.

Another common case is when you're preparing to sell or hand over your device. Performing a reset helps protect your personal data, ensuring nothing sensitive remains. Just keep in mind that this process wipes everything, so proceed carefully.


Troubleshooting Issues Post Hard Reset: What You Should Know

After completing a hard reset, you might run into a few unexpected hiccups. The key here is to troubleshoot step by step. Start by checking simple things like connectivity settings, since these may have reverted to default.

It’s also a good idea to update your device’s software—this alone often clears up small bugs that were lingering before. If you're not sure whether the problem is hardware-related, try running the device in safe mode to reveal any hidden conflicts. And remember: having too many apps open at once can sometimes cause performance lags as well.

If you want to explore the official reset instructions directly from Apple, you can visit Apple Support.

Common Issues and Solutions

Issue     Solution
Connectivity Problems     Verify Wi-Fi and cellular settings.
App Crashes     Update or reinstall problematic apps.
Battery Drain     Check for background apps and settings adjustments.

Preventive Measures to Avoid Frequent Hard Resets on Your iPhone

To reduce how often you need to perform hard resets on your iPhone, it helps to keep your software up to date, since new versions often fix underlying bugs. Also, be selective when installing apps—some poorly optimized apps can interfere with system performance.

Maintaining enough free storage is another key factor, as low space can slow down your device or cause unexpected issues. Try to avoid exposing your iPhone to extreme heat or cold, as temperature fluctuations can affect overall functionality. By following these habits, you’ll likely enjoy a smoother and more stable iPhone experience.


Conclusion

To sum it up, knowing how to hard reset an iPhone is incredibly handy—whether you're dealing with stubborn software problems or simply want to give your device a fresh start. Even though the exact steps differ slightly across iPhone models, the process is simple enough for anyone to do.

If your device stops working as expected, a hard reset can be a quick fix for many common issues. Just remember to back up your data beforehand, since this method erases everything on your phone. Ultimately, being comfortable with basic troubleshooting gives you more control over your device, and mastering this reset method helps keep your iPhone running smoothly.

Frequently Asked Questions

What is a hard reset on an iPhone?

A hard reset on an iPhone is a method of forcibly restarting the device, which can help resolve issues such as freezing or unresponsiveness without affecting your data.

How do I perform a hard reset on an iPhone?

To hard reset an iPhone, quickly press and release the Volume Up button, then quickly press and release the Volume Down button. Finally, press and hold the Side button until the Apple logo appears.

Will a hard reset erase my data?

No, a hard reset will not erase your data. It simply restarts the device without affecting any files or settings.

When should I consider doing a hard reset?

You should consider doing a hard reset if your iPhone is unresponsive, experiencing software glitches, or if you encounter issues that normal troubleshooting methods cannot resolve.

Is a hard reset the same as a factory reset?

No, a hard reset is different from a factory reset. A factory reset erases all data and settings on the device, returning it to its original state, whereas a hard reset simply restarts the device.

If you’re also looking to grow your Instagram presence, you can check out our full guide for free Instagram followers.

قراءة المزيد
How to Join a Telegram Group (Quick & Easy Guide for Beginners)

How to Join a Telegram Group (Quick & Easy Guide for Beginners)

Are you curious about the Telegram world and how to connect with people who share your interests? Joining a Telegram group is one of the easiest ways to meet new communities, access useful information, and be part of real discussions. This guide will help you understand how to join a Telegram group quickly and without any complications.

Whether you plan to use an invite link, scan a QR code, or join groups that don’t require admin approval, there are several simple methods you can try. Once you find the right community, connecting with people who enjoy the same topics can greatly enhance your online experience. Let’s break down the options available to you.

Understanding Telegram Groups: Basics and Benefits

Telegram groups are dynamic spaces where users can talk, share ideas, and collaborate. Their popularity comes from the freedom they offer—large communities can gather around shared interests without many restrictions.

If you’re wondering how to join telegram group easily, the process usually starts with finding the right how to join telegram group link, which takes you straight into active discussions. In some cases, you can also learn how to join telegram group without admin permission, although this depends on each group’s privacy settings.

These flexible options make Telegram groups a great way to meet new people and explore topics you care about.

How to Join a Telegram Group – Quick How-To Guide

Joining a Telegram group is simple once you know where to look. Here are the easiest methods to follow:

1. Join Through an Invite Link

The fastest way is to click an invite link. When you tap the link, Telegram opens automatically and shows you a “Join Group” button. One tap and you’re in.

2. Use the Telegram Search Bar

At the top of the app, tap the search icon and type keywords related to your interests—like crypto, music, fitness, or study groups. Browse the results and select any group you want to join.

3. Scan a QR Code

Some groups share QR codes for quick access. Open Telegram’s built-in QR scanner, scan the code, and you’ll be taken directly to the group page.

4. Find Groups on External Websites

Many websites curate active Telegram group links organized by categories. Simply choose a group and tap “Join” inside Telegram.

5. Join on Mobile

If you're trying to learn how to join telegram group on mobile, it’s even easier—just tap the link on your phone, and Telegram opens instantly with the join button.

6. Join Anonymously

If you prefer more privacy, you can learn how to join telegram group anonymously by joining via invite link while showing only your username instead of your phone number.

Step-by-Step Guide to Finding and Joining Telegram Groups

Finding and joining groups on Telegram can be simple once you know where to look. Start by typing keywords in the Telegram search bar—this method works instantly, though results may vary. You can also browse external websites that list curated Telegram group links, giving you access to a broader range of communities.

If you’re trying to figure out how to join telegram group on mobile, all you need to do is tap on a link or paste it directly into your Telegram app. For those who prefer more privacy, you can also discover how to join telegram group anonymously by joining through invite links without revealing your phone number to the group.


Navigating Privacy Settings: Managing Your Join Requests and Notifications

When you want to enhance your experience, understanding how to manage privacy settings is essential. This allows you to control join requests and notifications effectively. For instance, you can decide who sees your join requests or limit notifications for new members. Additionally, familiarizing yourself with the various settings can prevent unwanted alerts, but consider tweaking these settings based on your preferences. This balance will help you enjoy a more personalized interaction within the platform.

If you want to boost engagement on your posts while joining new communities, you can also check out this guide for getting free Telegram likes.

Tips for Engaging Effectively in Telegram Groups

To enhance your experience in Telegram groups, understanding how to join Telegram group discussions is crucial. Start by observing the group's dynamics; this helps you gauge the tone and preferred topics. Engage respectfully, contributing valuable insights while avoiding spammy behavior. Regular participation can establish your presence. Furthermore, consider setting notifications to stay updated without feeling overwhelmed. It’s often beneficial to ask thoughtful questions, as they invite interaction and enrich the conversation.

Troubleshooting Common Issues When Joining Telegram Groups

Joining a Telegram group can sometimes be tricky. If you encounter issues, first check your internet connection, as a weak signal can disrupt the process. How to join Telegram group links might not work due to expired invitations or privacy settings. Additionally, if you're receiving error messages, it could stem from the group being full or your account restrictions. To resolve this, consider refreshing the app or reaching out to the group admin for clarity.

Common Error Messages

When trying to join a group, some users face error messages that can be confusing. These might indicate whether the group is private, full, or if there are specific account restrictions. Understanding these messages can help determine next steps. How to join Telegram group effectively often involves double-checking these factors for a smoother experience.


Conclusion

In conclusion, learning how to join a Telegram group unlocks a whole new world of communication and connection. With just a few simple steps, you can easily become part of communities that share your interests and passions. Remember, the key lies in knowing where to find groups and how to engage respectfully with members. As you navigate through different communities, you’ll not only expand your network but also gain valuable insights and friendships. So, dive right in and start exploring the vibrant Telegram universe—exciting conversations await!

For official guidance directly from Telegram, you can also check their FAQ page.

قراءة المزيد